# Overview
**Welcome** [**Cliproxy**](https://cliproxy.com/)
**Cliproxy** is a proxy service platform designed to provide users with high anonymity and security. Through its global proxy network, users can obtain different types of proxies (including **Residential IP**, **Data Center IP**, etc.) for web crawling, data scraping, ad testing, SEO optimization, social media Management and other uses. **Cliproxy** provides a powerful IP proxy pool, flexible proxy configuration and easy-to-use API interface, designed to help businesses and individuals bypass geographical restrictions, avoid IP bans, and protect online privacy.
**Quickly use Cliproxy**
* [**Web** account mode (Traffic plan)](/traffic/using-setup)
* [How to use static IP in password or whitelist mode](/static/used)
**How to use Cliproxy using the built-in functions of IOS and Android systems**
* [How to use Cliproxy on IOS](/faq/cliproxy-faq4)
* [How to use Cliproxy on Android](/faq/cliproxy-faq3)
**FAQ**
* [How to verify proxy validity](/faq/cliproxy-faq1)
* [Why is the export IP different from the selected one](/faq/cliproxy-faq9)
* [What IP proxy protocols does Cliproxy support](/faq/cliproxy-faq8)
# Traffic planning tutorial
# Account mode
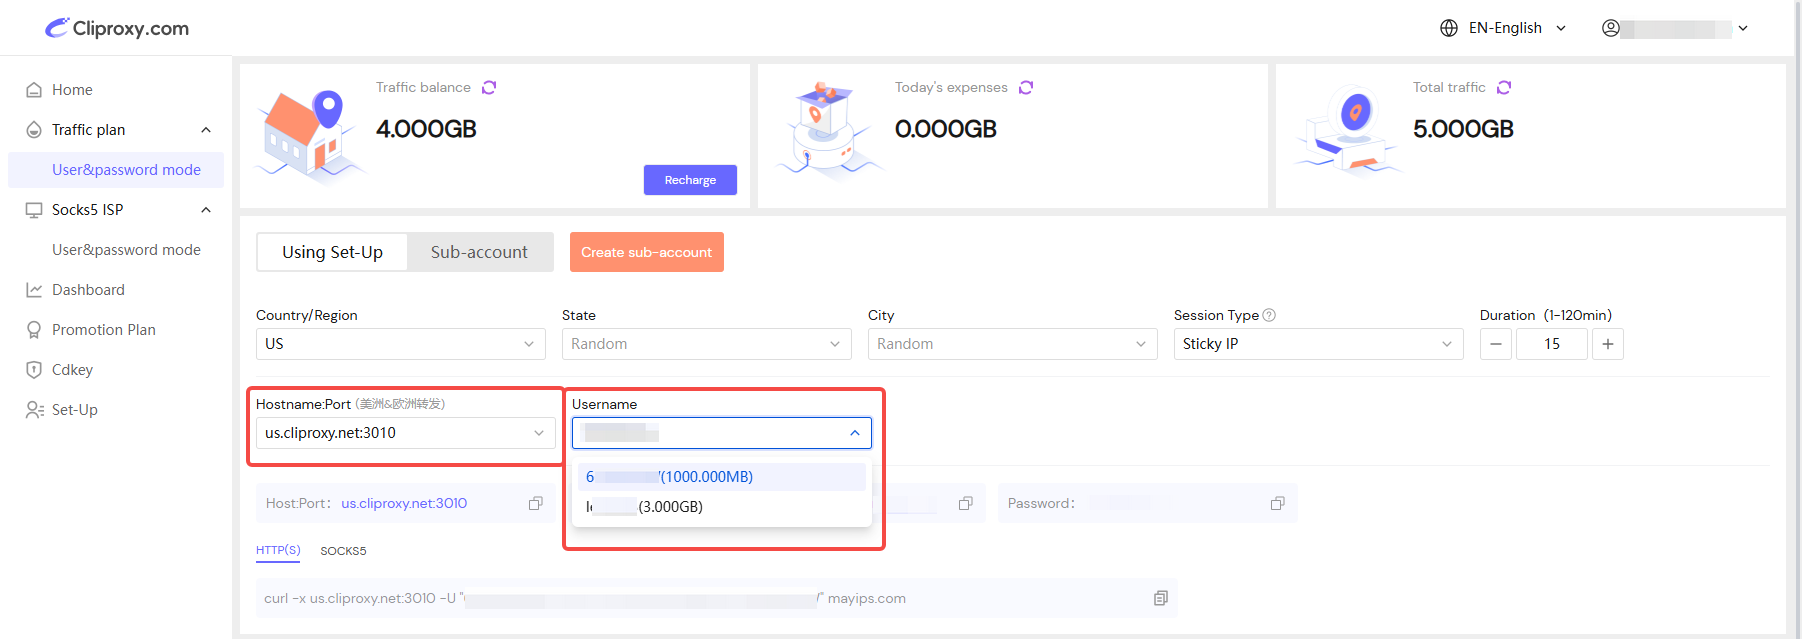
1. Select the corresponding country, state, city, session type and other conditions. There are two types of session types: Sticky IP and Rotating IP
**Sticky IP**: The destination IP will not change within the specified time. When the set time is exceeded, the IP will automatically change to another IP under the same conditions, the same IP address can support sessions of up to 120 minutes.
**Rotating IP**: Each request will use a new IP to access the destination address
2. Select the location of the forwarding machine. Forwarding machines in different regions have different effects on the proxy effect. Usually, choose a region that is closer to the destination IP or closer to the location of the user using the proxy.
3. Select the user. Different users have different usernames and passwords.
4. If you consider running multiple instances concurrently, you can generate multiple proxy information according to the actual scenario settings, and no additional charges will be charged if not used.
# Sub-account
When creating a sub-account according to business needs, please note the following points
1. The account and password must be 6-22 characters long and contain a combination of numbers and letters
2. The allocated traffic must not be higher than the total remaining traffic under the current account
3. To avoid account loss, theft, etc., it is recommended to change the sub-account information regularly
# Static IP Proxies
A static IP address is usually assigned by a network administrator or Internet Service Provider (ISP) and remains the same after the device is restarted or disconnected.
Characteristics of static IP**:**
1. **Fixed**: Once assigned to a device, a static IP address will not change automatically unless manually modified by a network administrator.
2. **Stability**: Because the address does not change, static IP is suitable for services that require long-term stable communication, such as website servers, mail servers, etc.
3. **Easy to manage**: For devices that require remote access, static IP can simplify network configuration and management. For example, you can use static IP to set firewall rules or set up domain name resolution.
4. **Configuration required**: Static IP requires manual configuration by the network administrator and usually needs to be obtained from the ISP or set by the administrator in the local network.
# How to use static IP in password or whitelist mode
## How to use the Static IP Proxies
**1. Choose the time and area of proxy usage**
**2. Click the "Connect" button of the corresponding IP in the "Operation" column of the IP list**
**3. Deduct the corresponding account balance according to the selected time and region**
**4. The usage list will display the purchased static IP, including important information such as username and password required for the link. At this point, you can use the static IP normally.**
**5. Click the "Operation" column in the usage list, and there will be three buttons: "To Use", "Renewal", and "Edit". When it is about to expire or there is a business need to use it for a longer period of time, you can renew it in advance. When the username and password do not conform to your usage habits, you can click the "Edit" button to modify and add notes.**
**6. When you click the Use button, a pop-up window will appear, where you can modify the copy format to adapt to quick paste in different environments.**
**7. "No account and password mode" is the whitelist mode. Please see below for specific usage.**
## How to use White IPS
**1. When the business environment cannot configure username and password information or you want to use static IP more quickly, you can use the whitelist mode to quickly use Cliproxy static IP. Click the "Add White IP" button to add**
**2. If there are multiple IPs, separate them with “,” and you can make notes for the currently added IP**
**3. The added IP will appear in the whitelist. When your current network IP is in the whitelist, you do not need to configure a username or password. You only need to configure the IP and port of the static IP to use Cliproxy's static IP directly.**
**4.Select the "Static IP Proxies" on the left and enter the "Usage Lists" interface. You can use Cliproxy static IP through IP information. Test command: curl -x socks5h://ip:port mayips.com**
# How to use fingerprint browser
A Fingerprint Browser is a tool used to protect user privacy, mask network behavior, or bypass certain restrictions.
* [How AdsPower Fingerprint Browser Uses Cliproxy](/browser/adspower)
* [How to use Cliproxy in BitBrowser](/browser/bit)
* [How to use Cliproxy in MBbrowser](/browser/mbbrowser)
* [How to use Cliproxy in Mulogin](/browser/mulogin)
* [How to use Cliproxy in ixBrowser](/browser/ixbrowser)
* [How to use Cliproxy in Lalicat](/browser/lalicat)
* [How to use Cliproxy in VMLogin](/browser/vmlogin)
* [How to use Cliproxy in Undetectable](/browser/undetectable)
* [How to use Cliproxy in MoreLogin](/browser/morelogin)
* [How to use Cliproxy in Linken Sphere](/browser/linkensphere)
# How AdsPower Fingerprint Browser Uses Cliproxy
**1.Open AdsPower, click "New Profile" in the upper left corner, and select the proxy type in the proxy information bar on the right. You can choose HTTP or Socks5. Cliproxy supports both HTTP and Socks5 proxy types.**
**2.According to the "Host:Port", "Proxy username", and "Proxy Password" information corresponding to the Cliproxy configuration, click "Check Proxy" and the test results will appear.**
**3.After adding the environment, a record will be added to the homepage. Clicking the "Open" button on the right will open a new browser window.**
# How to use Cliproxy in BitBrowser
**1.Open BitBrowser, select the Browser Profiles in the left navigation bar, click "Add" in the upper left corner, and select the proxy type in the proxy information bar on the right. You can choose HTTP or Socks5. Cliproxy supports both HTTP and Socks5 proxy types.**
**2.According to the "Host", "Port", "Username" and "Password" information corresponding to the Cliproxy configuration, click "Check Proxy" and the test results will appear.**
**3.After adding the window, a record will be added to the homepage. Clicking the "Open" button on the right will open a new browser window.**
# How to use Cliproxy in MBbrowser
**1. Open the MBbrowser, click "Create New Session" in the lower left corner, and select Proxy in the pop-up window. You can choose HTTP or Socks5. Cliproxy supports both HTTP and Socks5 proxy types.**
**2. According to the "Host:Port", "Account", and "Password" information corresponding to the Cliproxy configuration, click "Test" and the test results will appear.**
**3. After adding the environment, a record will be added to the homepage. Clicking the "Run" button on the right will open a new browser window**
# How to use Cliproxy with Mulogin fingerprint browser
Mulogin improves privacy by simulating user fingerprints (such as browser fingerprints, screen resolution, operating system, language settings, etc.).
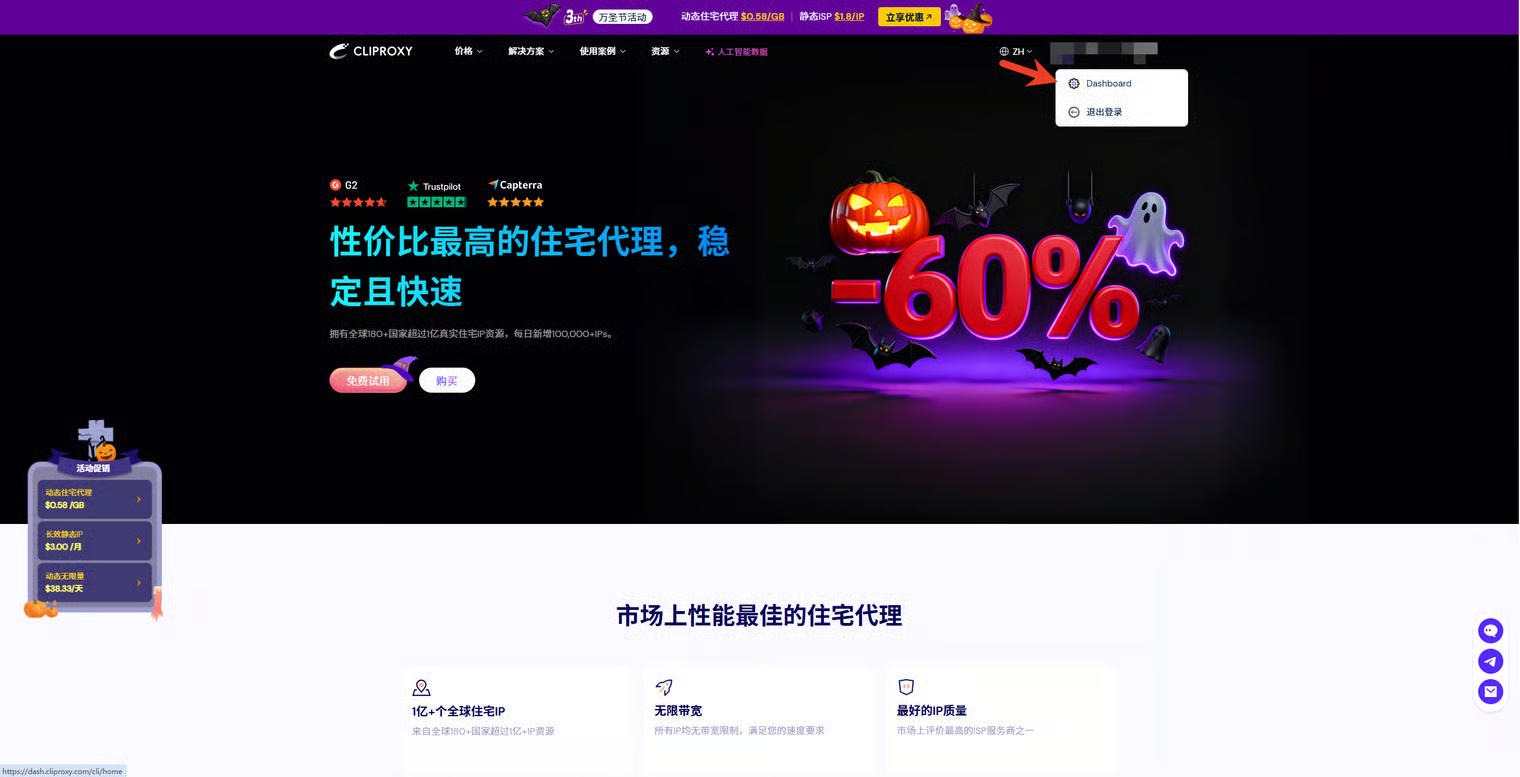
1. Go to the cliproxy official website and click on the upper right corner to log in. If you do not have an account, please click Register to complete the account registration process.
2. Enter your account to enter the official website of cliproxy
3. This article takes Socks5 as an example. Select the country, region, and street of the target IP you want to extract. Finally, select the red arrow \[Connect]
4. Click \[Copy] to complete the IP copying.
5. Enter MuLogin fingerprint browser to create a new browser window and customize the browser configuration (free trial for 3 days for new users)
6. Change your window parameter configuration to use the proxy IP of cliproxy
7. Paste the proxy IP you copied into the corresponding column and click \[Save]
Use[ Mulogin](https://www.mulogin.com/?ref=cliproxy) now
# How to configure Cliproxy proxy in ixBrowser fingerprint browser
ixBrowser is a powerful, permanently free fingerprint browser suitable for multi-account management in various scenarios.
1、Log in to Cliproxy official website . If you don’t have an account, please complete the registration process.
2、Please select the IP type you want to extract on the left (here we take Socks5 as an example). Then select your target country, region and street information in \[Proxy pools], click \[Search] to get your target IP list, and finally select a suitable IP and click \[Connect].
3、Click \[Copy] in \[Usage Lists] to obtain the host, port, account, and password information of this IP.
4、Open the ixBrowser fingerprint browser and log in; create a new window to complete the pre-configuration conditions of the proxy. Please click the operations in order, select the platform and group information that suits you (if not specified, please select your business platform and remarks information in order), and finally click \[Proxy Configuration].
5、Enter the proxy settings, select the proxy type as Socks5, and paste the IP data you copied into \[Proxy Host]. ixBrowser will automatically divide the columns and place your IP data in the corresponding positions. Click \[Proxy Detection] to check whether your IP information is true and reliable (green IP information means no problem). Finally, click \[Create] in the lower right corner.
6、Click \[Open] to enter the browser window of the currently configured IP.
7、You can see that the IP change is successful and the configuration is complete. The quality of this IP is an extremely pure family residential IP resource.
Experience the best fingerprint browser now—[ixBrowser](https://ixbrowser.com/?utm_source=cliproxy)
# How to configure Cliproxy proxy in Lalicat fingerprint browser
1、Open the Lalimao Fingerprint Browser, click \[Add Browser], and enter the \[Name] of your service in the configuration menu on the right, such as video service or any other remarks. Finally, select the Socks5 proxy type in the \[Proxy Settings] below.
2、Paste the relevant information from \[Extract IP from Cliproxy] to the corresponding column, click \[Check Network] above, and you can see the location information of the IP appears below, which means the current IP can be configured successfully. Finally, click \[Save] below.
3、Open the window of successful configuration
4、You can see that the location change was successful and the quality of the IP is very high, which is very suitable for your business.
# How to configure Cliproxy proxy in VMLogin fingerprint browser
1\. Visit the [VMLogin Antidetect Browser](https://www.vmlogin.us/) official website, register an account, and get a 3-day free trial.
2.Download and install the VMLogin client, then log in with your registered account.
3.In the left-side menu of the client, click \[New browser profile] or navigate to the \[Browser profile] page and select "Create a new profile" to add a new browser.
4.On the new browser profile page, enter the "Display name" and other essential details.
5.Click "Set proxy server" -> Enable proxy server.
6.Choose the proxy type, enter the proxy details from Cliproxy, or click "Paste proxy info" for quick input.
7.Once the proxy information is added, click "Test Proxy". Save the settings if the test is successful.
8.After completing all configurations, click "Save Profile", and you're ready to launch the profile.
# How to configure Cliproxy proxy in Undetectable
1. Enter the Undetectable Fingerprint Browser, enter any value in \[New User Profile], such as Test or any other information, and finally click \[Create] below.
2. Next, you need to add the proxy information of Cliproxy. Select \[New Proxy] in \[Proxy], select \[SOCKS5] proxy type below, and paste the proxy information copied from Cliproxy backend directly into the input box on the right; finally, click the \[Detection Symbol] on the right, and you can see the location information of the IP appears below, indicating that the IP is normally configurable.
Finally, click \[Save] below, and then select \[Open]
3. Successfully enter the browser window of the proxy and you can see that the IP detection information is very perfect data. You can use the IP to conduct any of your business.
# How to use Cliproxy proxy for business in MoreLogin
MoreLogin is a powerful fingerprint browser designed for multi-account management and privacy protection.
1、Log in \[ MoreLogin ], click \[ New Profile ] in the upper left corner, select \[ New Proxy ] and select Socks5 in 'Proxy Type', paste the proxy IP data information you copied from the Cliproxy backend in 'Proxy Server' ( MoreLogin will automatically recognize and accurately collect the information ), click \[ Proxy Detection ] below, you can see that the detection is successful and the specific information of the IP appears; finally click \[ Confirm ].
2、After clicking \[ Confirm ], the home page will be automatically redirected. Please click \[ Start ] to open the window environment of the proxy browser you just created.
3、Enter the browser window, you can see that the quality of the IP is very good \[ Home Broadband - Extremely Pure - Native IP ], and the speed test of the IP also perfectly meets the scenario requirements of most businesses in the market.
# How to use Cliproxy in Linken Sphere
1、Log in to \[ Linken Sphere ], enter the main page, click \[New Session] in the upper left corner, set the options of the proxy window, and select \[Edit Session].
2、In the \[Connection] below, select Socks5 as the proxy type, and paste the IP information data copied from the Cliproxy backend in the following column, then click \[Check Proxy]. You can see the country and region information of the IP displayed below, proving that the IP detection is successful; finally, click \[Save & Run] below, which will automatically close the current page and enter the configuration environment.
3、Enter the window page and visit any detection website to query the data information of the IP. You can see that the quality of the IP is very high \[Home Broadband-Extremely Pure-Native IP], which can meet the proxy needs of any business
# Local browser
[Google Chrome](/browser1/google)
[Firefox browser](/browser1/firefox)
[Edge browser](/browser1/edge)
# Google Chrome
To use a SOCKS5 proxy in Google Chrome, you can follow these methods:
## Method 1: Using Chrome Launch Parameters
1. **Close Chrome** if it's open.
2. Open **Command Prompt** or **PowerShell** (in administrator mode).
3. Navigate to Chrome's installation directory, usually found at:
* `C:\Program Files\Google\Chrome\Application\`
* or `C:\Program Files (x86)\Google\Chrome\Application\`
4. Enter the following command to launch Chrome with the `--proxy-server` parameter, specifying your SOCKS5 proxy:
```bash
start chrome.exe --proxy-server="socks5://:"
```
For example:
```bash
start chrome.exe --proxy-server="socks5://127.0.0.1:1080"
```
This will start Chrome and route traffic through the specified SOCKS5 proxy.
5. If you want to use HTTP proxy, **change socks5** in the above command to **http**.
## Method 2: Using System Proxy Settings
1. Open **Windows Settings**.
2. Go to **Network & Internet** > **Proxy**.
3. Under **Manual proxy setup**, enable **Use a proxy server**, and enter the SOCKS5 proxy IP address and port.
4. Click **Save**, and then restart Chrome.
This method will make Chrome automatically use the system proxy settings.
**Special note: Chrome cannot directly set the account and password, so the above steps are only valid for static IP whitelist mode. If you want to use Cliproxy traffic plan, you need to download the extension program for configuration.**
# Firefox browser
To use a SOCKS5 proxy in Firefox, follow these steps:
#### Steps:
1. Open **Firefox** browser.
2. Click the **three horizontal lines (menu)** in the top-right corner and select **Settings**.
3. In the left-hand menu, choose **Network Settings**, then click the **Settings...** button.
4. In the **Connection Settings** window that appears, select **Manual proxy configuration**.
5. In the **SOCKS Host** field, enter the **IP address** of your SOCKS5 proxy, and in the **Port** field, enter the corresponding port number.
6. Make sure to select **SOCKS v5**, not the default **SOCKS v4**.
7. If you want Firefox to resolve DNS requests through the proxy, check the option **Proxy DNS when using SOCKS v5**.
8. Click **OK** to save your settings.
#### Example:
* **SOCKS Host**: `127.0.0.1`
* **Port**: `1080`
After completing these steps, Firefox will route its network traffic through the specified SOCKS5 proxy, without affecting system-wide proxy settings.
**Special note: Firefox cannot directly set the account and password, so the above steps are only valid for static IP whitelist mode. If you want to use Cliproxy traffic plan, you need to download additional extensions for configuration.**
# Edge browser
Need to configure it through the system proxy settings or use a launch parameter, as Edge doesn’t have built-in settings for proxies like Firefox.
Here are two methods to set up a SOCKS5 proxy in Microsoft Edge:
#### Method 1: Using System Proxy Settings
1. Open **Windows Settings** by pressing **Windows + I**.
2. Go to **Network & Internet** > **Proxy**.
3. In the **Manual proxy setup** section, turn on **Use a proxy server**.
4. Enter the **SOCKS5 proxy server IP** and **port**.
5. **Save** the settings and restart Edge.
**Example:**
* **Proxy server**: `127.0.0.1`
* **Port**: `1080`
After you save the settings, Edge will route its traffic through the SOCKS5 proxy, since it uses the system-wide proxy settings.
#### Method 2: Using Edge Launch Parameters
You can also launch Microsoft Edge with a SOCKS5 proxy via the command line.
1. Close Edge if it's open.
2. Open **Command Prompt** or **PowerShell** (with administrator rights).
3. Navigate to the Edge installation directory, usually located at:
* `C:\Program Files (x86)\Microsoft\Edge\Application\`
4. Launch Edge with the `--proxy-server` argument:
```bash
start msedge.exe --proxy-server="socks5://:"
```
For example:
```bash
start msedge.exe --proxy-server="socks5://127.0.0.1:1080"
```
This will start Microsoft Edge with the specified SOCKS5 proxy.
**Special note: Edge cannot directly set the account and password, so the above steps are only valid fo static IP whitelist mode. If you want to use Cliproxy traffic plan, you need to download additional extensions for configuration.**
# FAQ
# How to verify the validity of the agent(With Username/Password Authentication)
#### 1. **Using Command-Line Tools (With Username/Password Authentication)**
* **Socks5 Proxy:** You can use `curl` to authenticate and test a Socks5 proxy:
```bash
curl --proxy socks5://username:password@Hostname:Port https://mayips.com
```
If the proxy is valid and authentication is successful, you will see the response from the website. If authentication fails, you will likely receive a `403 Forbidden` or other authentication error.
* **HTTP Proxy:** Similarly, for HTTP proxies, use:
```bash
curl --proxy http://username:password@Hostname:Port https://mayips.com
```
If the proxy is valid and the password is correct, you will see the website content. If there's an error, it will typically indicate authentication failure (e.g., `407 Proxy Authentication Required`).
#### 2. **Using Browser Configuration (With Username/Password Authentication)**
To manually verify the proxy with username and password in a browser, you can follow these steps:
* **Chrome/Firefox:**
1. Go to your browser's proxy settings (typically in network settings).
2. Enter the proxy server address, port, username, and password.
3. Visit a website to see if it loads successfully. If the proxy and authentication are correct, the website content should appear; if authentication fails, the browser will usually show `Proxy authentication failed` or `403 Forbidden`.
#### 3. **Using Proxy Testing Software (With Username/Password Authentication)**
Many proxy testing tools support username and password authentication, such as **Proxy Switcher** or **Proxifier**. In the software, you would configure the proxy by entering the proxy address, port, username, and password, then test to see if the proxy works correctly.
#### 4. **Using Postman for Testing**
You can also use Postman to test the proxy. Configure the proxy with username and password authentication in Postman, then send a request to see if the response is valid.
#### Common Errors When Proxy Authentication Fails:
* **`407 Proxy Authentication Required`**: The proxy server requires authentication.
* **`403 Forbidden`**: Proxy authentication failed, or the proxy server is rejecting the connection.
* **`Timeout`**: The proxy request timed out, which may indicate that the proxy server is unreachable or incorrectly configured.
These methods can help you verify the validity of a proxy that requires username and password authentication.
# Using Cliproxy on Android
Android provides a way to configure a proxy through Wi-Fi settings, which can be used to configure a proxy for a specific network.
1. Connect to a Wi-Fi network\*\*:
1. Open the device's **Settings**.
2. Go to **Wi-Fi** settings and select the Wi-Fi network for which you want to configure a proxy.
2. **Configure a proxy**:
1. In Wi-Fi network settings, tap **Connected network** (network name).
2. Tap **Modify network** or **Advanced settings** (the specific options vary depending on the Android version).
3. Enable **Proxy** settings, which usually have three options:
1. **None**: Do not use a proxy (default).
2. **Manual**: Manually configure the proxy server.
3. **Automatic**: Set via the automatic proxy configuration file (PAC).
3. **Enter proxy details**:
1. If you selected **Manual**, enter the IP address and port of the proxy server (for example, SOCKS5 or HTTP proxy).
2. For a SOCKS5 proxy, make sure SOCKS5 is selected in Proxy type.
3. If the proxy requires authentication, enter the proxy username and password.
4. **Save settings**:
1. When you are finished, tap Save and the network connection will forward traffic through the specified proxy server.
**Notes on configuring proxies:**
* In Android, only networks connected via Wi-Fi can be configured with proxies. Mobile data connections (such as 4G or 5G) generally do not have proxies configured directly in system settings.
* Some Android apps (such as browsers or other apps) may provide independent proxy settings.
# Using Cliproxy on iOS
Proxy configuration for iOS devices is also done through Wi-Fi network settings, similar to Android.
1. **Connect to a Wi-Fi network**:
1. Open your device's **Settings**.
2. Go to **Wi-Fi** settings and select the Wi-Fi network for which you want to configure a proxy.
2. Configure the proxy\*\*:
1. Tap **i** (information button) next to the connected Wi-Fi network.
2. Scroll down to the **HTTP Proxy** section and select **Manual** or **Automatic**.
1. **Manual**: Manually enter the proxy's IP address, port, and authentication information (if required).
2. **Automatic**: Use an **Automatic Proxy Configuration** (PAC) file to automatically configure the proxy.
3. **Enter proxy details**:
1. If you selected **Manual**, enter the **Address** and **Port** of the proxy server.
2. Enter the username and password for the proxy (if authentication is required).
4. Save settings\*\*:
1. Once the settings are complete, return and all traffic from your iOS device (through this Wi-Fi network) will be routed through the configured proxy.
**Notes on configuring the proxy:**
* Similar to Android, iOS also only allows you to configure a proxy for Wi-Fi connections, and you cannot directly configure a proxy for mobile data.
# How to deduct fees for multiple device logins
Multiple device logins will be deducted based on actual usage.
# What is a Residential Agent
A **Residential IP** is an IP address assigned to a user by an Internet Service Provider (ISP) for residential (home) internet connections. These IP addresses are linked to real physical addresses and are typically used by individual consumers rather than businesses or data centers. Residential IPs are commonly associated with regular home broadband connections such as DSL, cable, or fiber optic.
#### Key Characteristics of Residential IPs:
1. **Source**: Residential IPs are assigned to homes or personal internet connections by ISPs (e.g., Comcast, AT\&T, BT).
2. **Trustworthiness**: These IPs are seen as coming from "real" users, which is why they are more trusted by websites and services. They are less likely to be flagged as suspicious or associated with bots or scrapers.
3. **Location**: Residential IPs are geographically linked to specific areas, often corresponding to the user’s home address, which allows for precise geolocation.
#### Residential IP vs Data Center IP:
* **Residential IPs**: These come from home ISPs and are less likely to be flagged as suspicious by websites or services. They are ideal for tasks like web scraping, ad verification, or bypassing geo-restrictions because they mimic the behavior of genuine users.
* **Data Center IPs**: These come from data centers or cloud hosting services, and since they often host a large number of users or automated systems, they are more likely to be blocked or flagged by websites as potential threats or bots.
#### Benefits of Residential IPs:
1. **Higher Trustworthiness**: Websites generally trust residential IPs more because they appear to come from real users, which reduces the chances of being blocked or flagged.
2. **Access to Geo-Restricted Content**: Residential IPs can be used to access content or services that are region-locked, as they appear to come from specific countries or regions.
3. **Avoiding IP Bans**: Since residential IPs are associated with legitimate consumer connections, they are less likely to be blacklisted or banned compared to data center IPs, which are often used by bots and web scrapers.
#### Use Cases:
* **Web Scraping and Data Collection**: Residential IPs are often used in scraping web data without getting blocked by websites.
* **Ad Verification**: Marketers use residential IPs to verify if ads are being served correctly in different regions.
* **Accessing Geo-Restricted Content**: Users can use residential IPs to access services or websites that are only available in certain locations, such as streaming services.
* **Account Creation and Management**: Residential IPs are helpful in managing multiple online accounts, as they appear like typical user behavior.
#### Static vs Dynamic Residential IPs:
* **Static Residential IP**: A fixed IP that stays the same over time. Ideal for tasks that require a persistent online identity, like running servers, accessing services remotely, or managing long-term projects.
* **Dynamic Residential IP**: An IP that changes every time the user connects to the internet. This type of IP is commonly used by general home internet users and offers privacy benefits since the IP address changes periodically.
In summary, a **Residential IP** is an IP address associated with a home internet connection, offering higher trust levels, more privacy, and lower likelihood of being flagged as suspicious compared to data center IPs. They are widely used in various legitimate online activities like web scraping, ad verification, and accessing region-locked content.
# What is a static IP
A **Static IP** is an **IP address** that is permanently assigned to a device (such as a computer, server, or router) and remains unchanged over time. Once it is allocated, it stays fixed, unlike a dynamic IP that can change each time the device connects to the internet.
#### Key Characteristics:
1. **Fixed and Unchanging**: A static IP address does not change over time. Every time the device connects to the network, it uses the same IP address.
2. **Long-Term Use**: Static IPs are generally used for services that need long-term, consistent connectivity.
3. **Manual Configuration**: Static IPs are either manually configured by the user or assigned by the Internet Service Provider (ISP). They typically require special setup.
4. **Uniqueness**: Static IPs are unique and typically tied to a specific device or location.
#### Advantages of Static IP:
1. **Stability**: Static IPs offer a high level of stability, making them ideal for applications that require a reliable, long-term connection.
2. **Remote Access**: Provides easy and reliable remote access for system administrators and users to manage devices or servers.
3. **Reliable Geolocation**: Static IPs are usually associated with a specific geographic location, which is important for location-based services.
#### Disadvantages of Static IP:
1. **Security Risks**: Because the IP address remains the same, it can be targeted by hackers for attacks. Additional security measures like firewalls and encryption are needed for protection.
2. **Higher Costs**: Static IPs often come with additional costs since they require manual configuration and allocation by the ISP.
3. **Limited Supply**: Static IP addresses are a finite resource, so they must be managed carefully in large networks to avoid unnecessary waste.
# What IP proxy protocols does Cliproxy support?
Cliproxy is a provider of **IP proxy** services, widely used for **web scraping**, **data extraction**, **ad verification**, **SEO optimization**, **account management**, and more. They support multiple types of proxy protocols, including:
#### 1. **HTTP/HTTPS Proxies**
* **HTTP Proxy**: A standard proxy that forwards web requests using the **HTTP** protocol. It is commonly used for **web browsing** and **API requests**.
* **HTTPS Proxy**: Similar to the HTTP proxy but supports **encrypted communication**, making it suitable for secure websites that use the HTTPS protocol.
* **Use Cases**:
* Web scraping, API interactions, ad verification, and other tasks that involve handling web traffic.
* HTTPS proxies ensure secure communication when dealing with sensitive data, such as payment processing or account logins.
#### 2. **SOCKS5 Proxy**
* **SOCKS5 Proxy**: A more general proxy protocol that supports various network traffic types and supports more complex network applications. Compared with HTTP proxy, SOCKS5 proxy has higher flexibility and stability.
* **Use Cases**:
* **P2P downloads**, **online gaming**, **streaming**, **remote desktop** connections, and other applications that require different types of internet traffic.
* SOCKS5 is also commonly used in **web scraping** and bypassing firewalls, as it can handle all kinds of traffic, making it harder for websites to detect.
# Why is the export IP different from the selected one?
Each IP detection website is queried based on a database, and there are differences between old and new databases, so the queried IP address, ISP type, location and other information are different. If it affects business development, you can contact customer service to change the IP.
Recommend several IP detection websites:
[https://whoer.net](https://whoer.net/)
[https://ipinfo.io](https://ipinfo.io/)
[https://mayips.com](https://mayips.com/)
# How to quickly integrate and use Cliproxy traffic packages
In Cliproxy, the proxy connection parameters (host, port, account, password) have specific logic to dynamically select the exit IP through the intermediate server.
#### Host and Port
**Host:** The IP or domain name of the connected Socks5 intermediate server.
**Port:** The Socks5 port that the intermediate server listens on.
**Function:**
* All clients connect to the same intermediate server.
* This server acts as a forwarding center for proxy requests.
**Special note**:Currently only us.cliproxy.io (United States) and sg.cliproxy.io (Singapore) are provided as intermediate servers. Please select an intermediate server that is closer to the region where the exit IP is located.
#### Account
**Format 1 (Sticky IP):**`username-region-region abbreviation-st-state name-sid-current session unique identifier-t-IP duration (`For example: test123456-region-US-st-Louisiana-sid-e6CXdJDm-t-15)
**Format 2 (Rotating IP)**:`username-region-region abbreviation-st-state name (`For example: test123456-region-US-st-Louisiana)
**Function:**
* The account part (`username`) is used to identify the user.
* The server parses the parameters of `username`, `region` and `st`, and selects the appropriate export according to the configuration.
**Special Note**:
* All parameters are separated by "-", of which **username** and **region** are **required** items, and other parameters can be empty. For example, format 1 can be **test123456-region-US-t-15** and format 2 can be **test123456-region-US**
* If the **current session identifier (sid)** changes, it will be considered a new request, and the intermediate server will automatically assign a **new IP**
#### Password
**Function:**Used for user authentication. Does not affect the selection of the egress IP, only for security verification.
#### Logical process
**Client connects to the Socks5 server**
* Use the specified host:port to connect.
**Server parses account information**
* Extracts `username` `region parameter` `session type` information
* Verifies whether `username` is valid.
* Finds whether the `egress IP` is available according to the `region parameter` (if not specified, the default policy is used for allocation).
**Password authentication**
* The server verifies whether `password` is correct.
* If the authentication fails, the connection is rejected.
**Egress IP selection**
* If the `egress IP geographic location` is explicitly specified in the account, the geographic location IP is used as the egress.
* If the `geolocation` is not specified, the egress IP is allocated according to the predefined policy (such as polling, load balancing, etc.).
**Connect to target server**
* The server initiates a connection to the target address based on the resolved exit IP and forwards traffic.
#### Typical Examples
| Cliproxy Account | Connection exit IP location | 备注 |
| --------------------------------------------------- | --------------------------- | ------------------------------------------------------------------------------------------------------------------------------------------- |
| test123456-region-US-st-Louisiana-sid-e6CXdJDm-t-15 | Louisiana, USA | When the sid changes, the egress IP will also change. If the sid does not change, the egress IP will automatically switch after 15 minutes. |
| test123456-region-SG-t-15 | Singapore | null |
| test123456-region-HK | Hongkong | Each request will connect to the target website with a new exit IP |
# Unlimited Proxy Tutorial - Bandwidth
# Account Password Mode
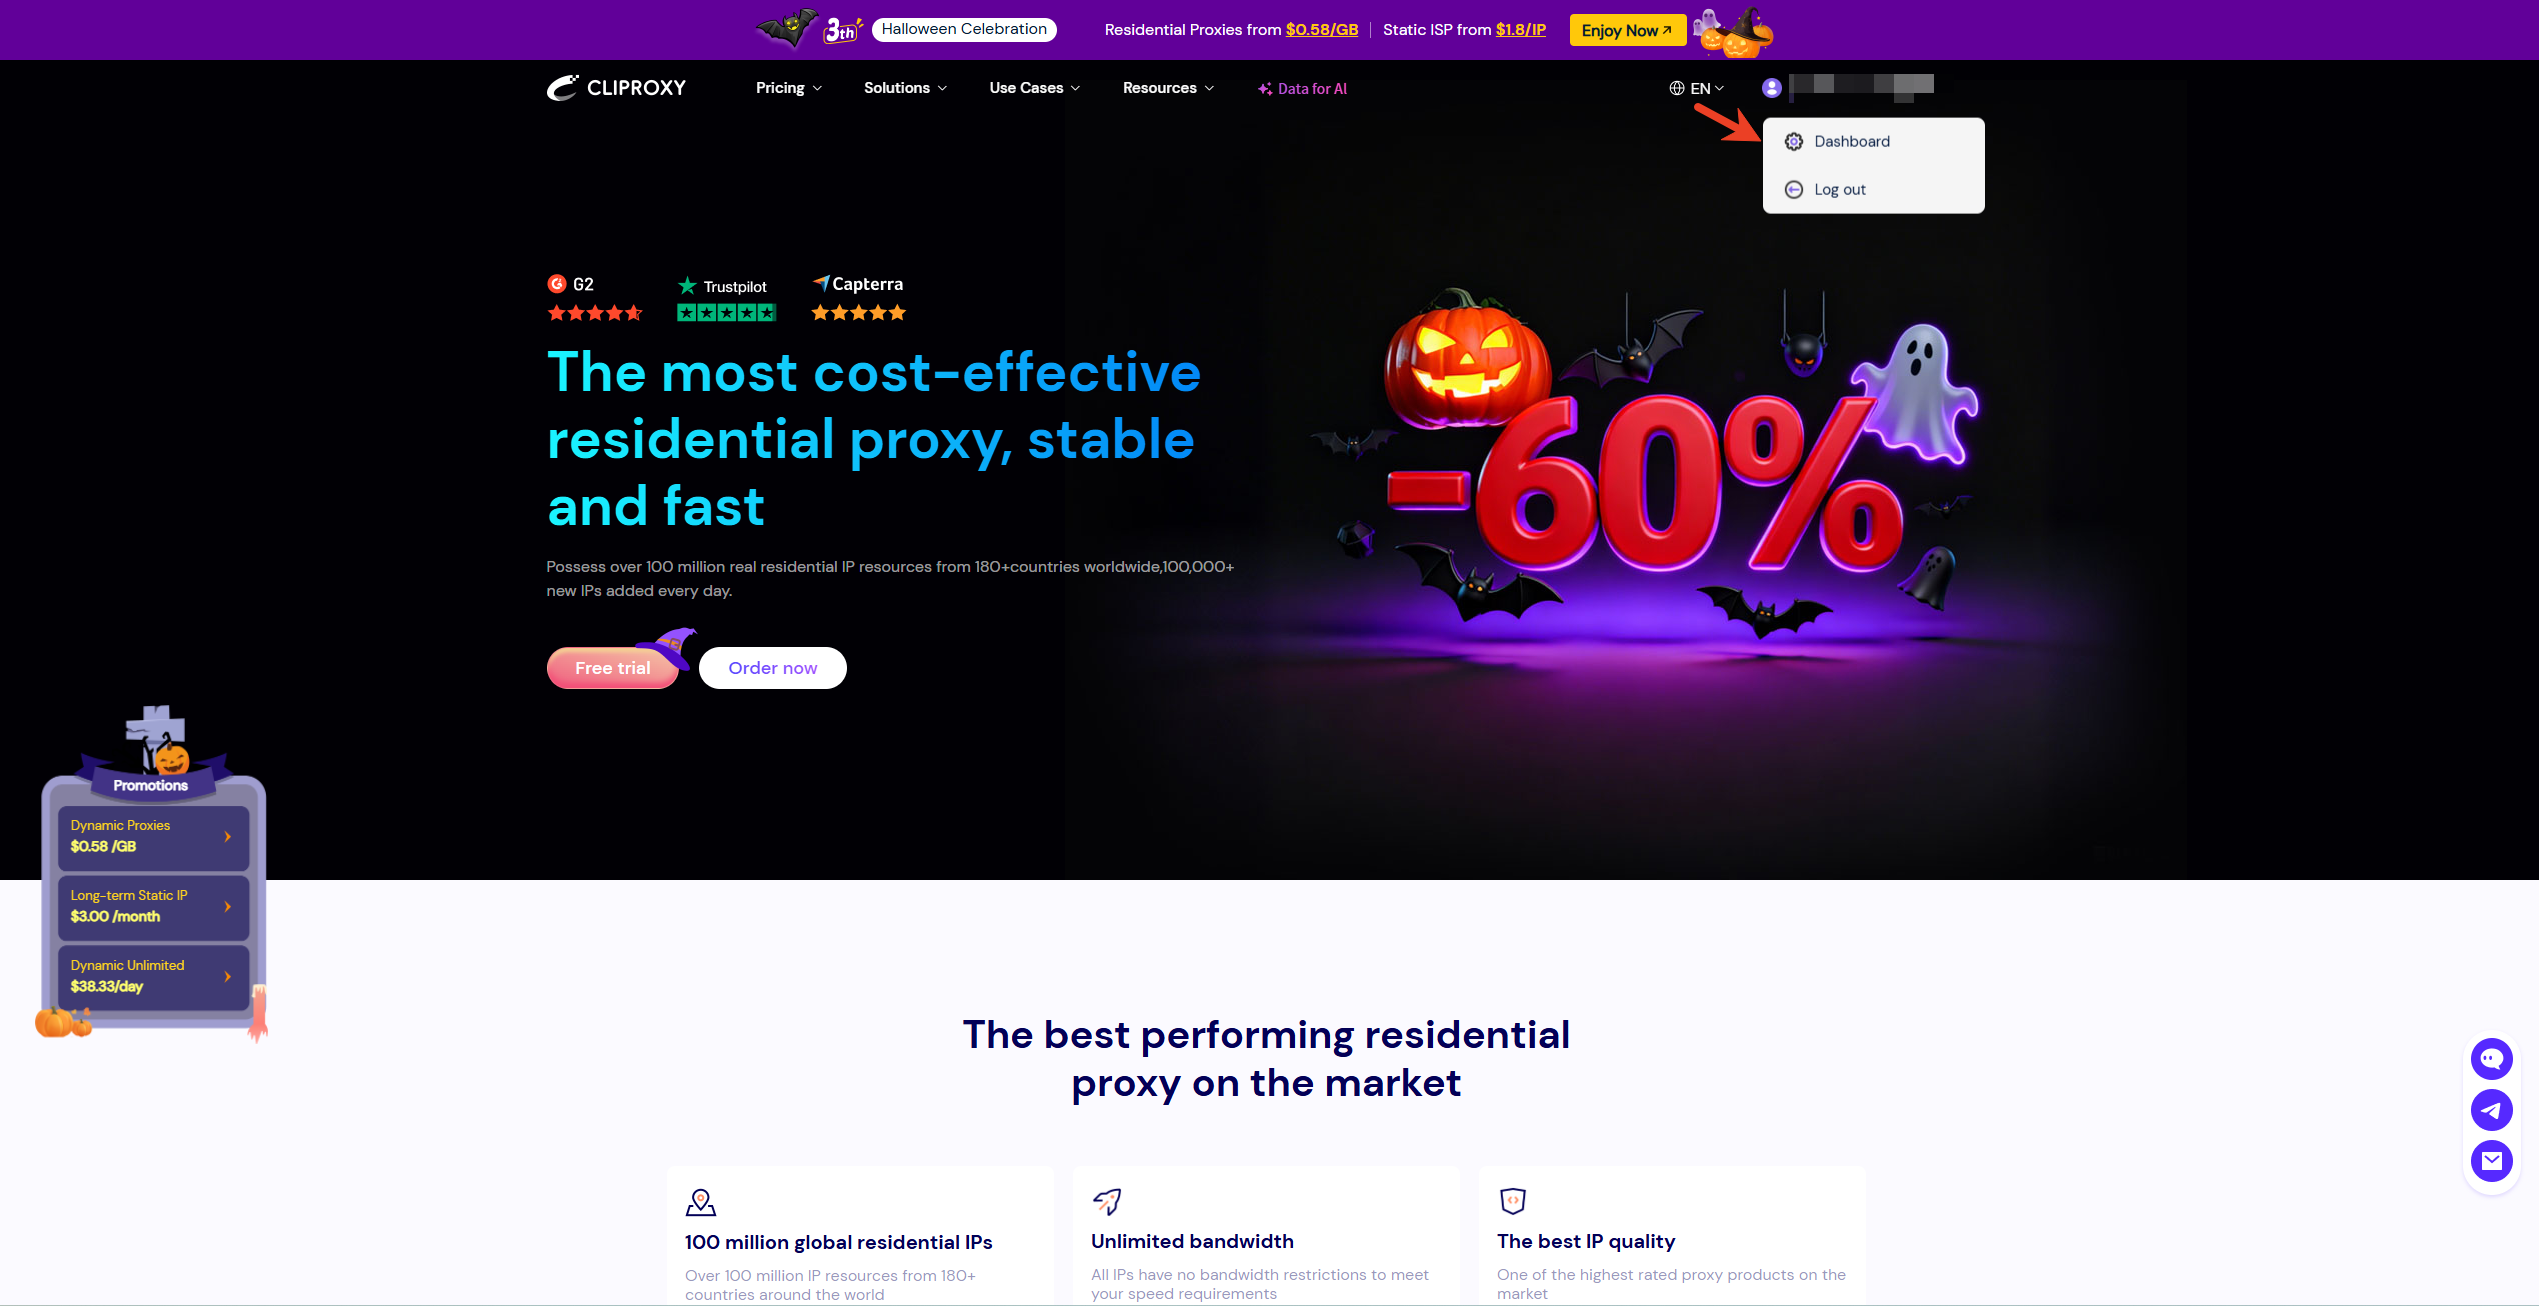
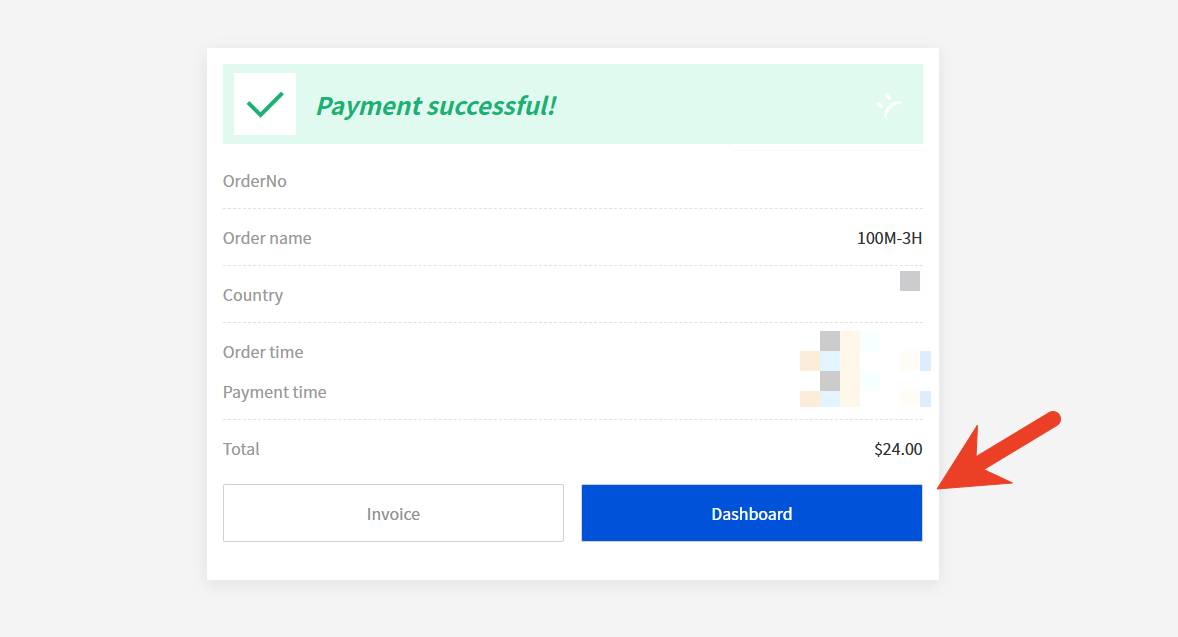
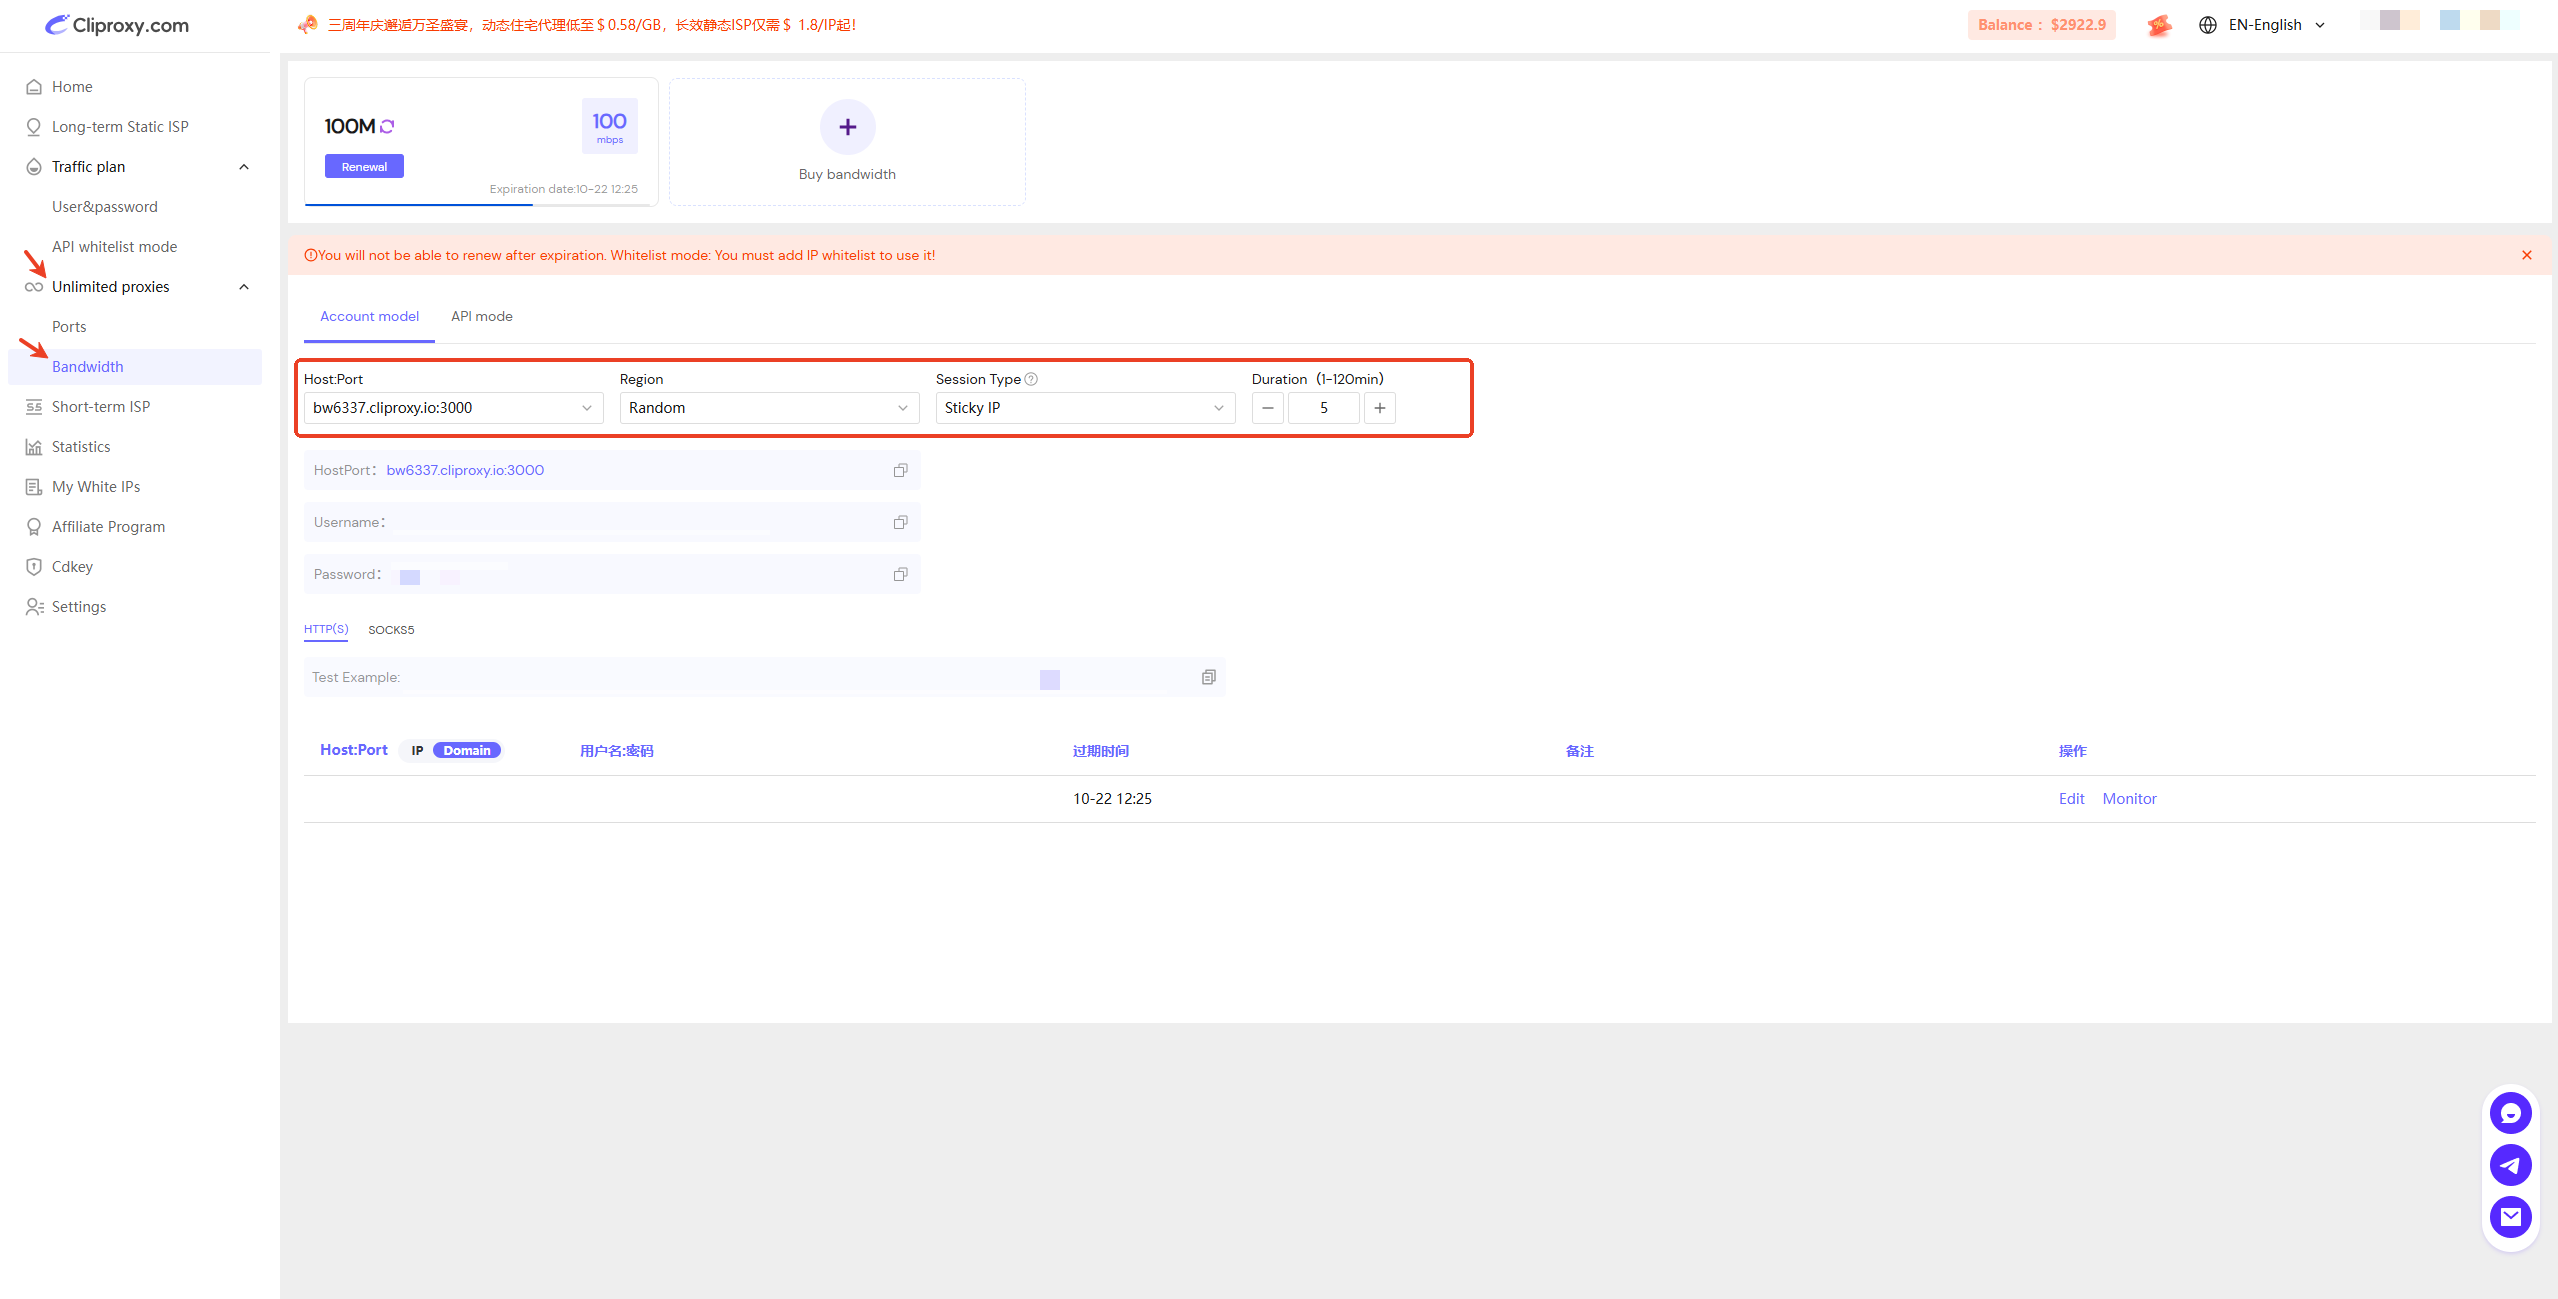
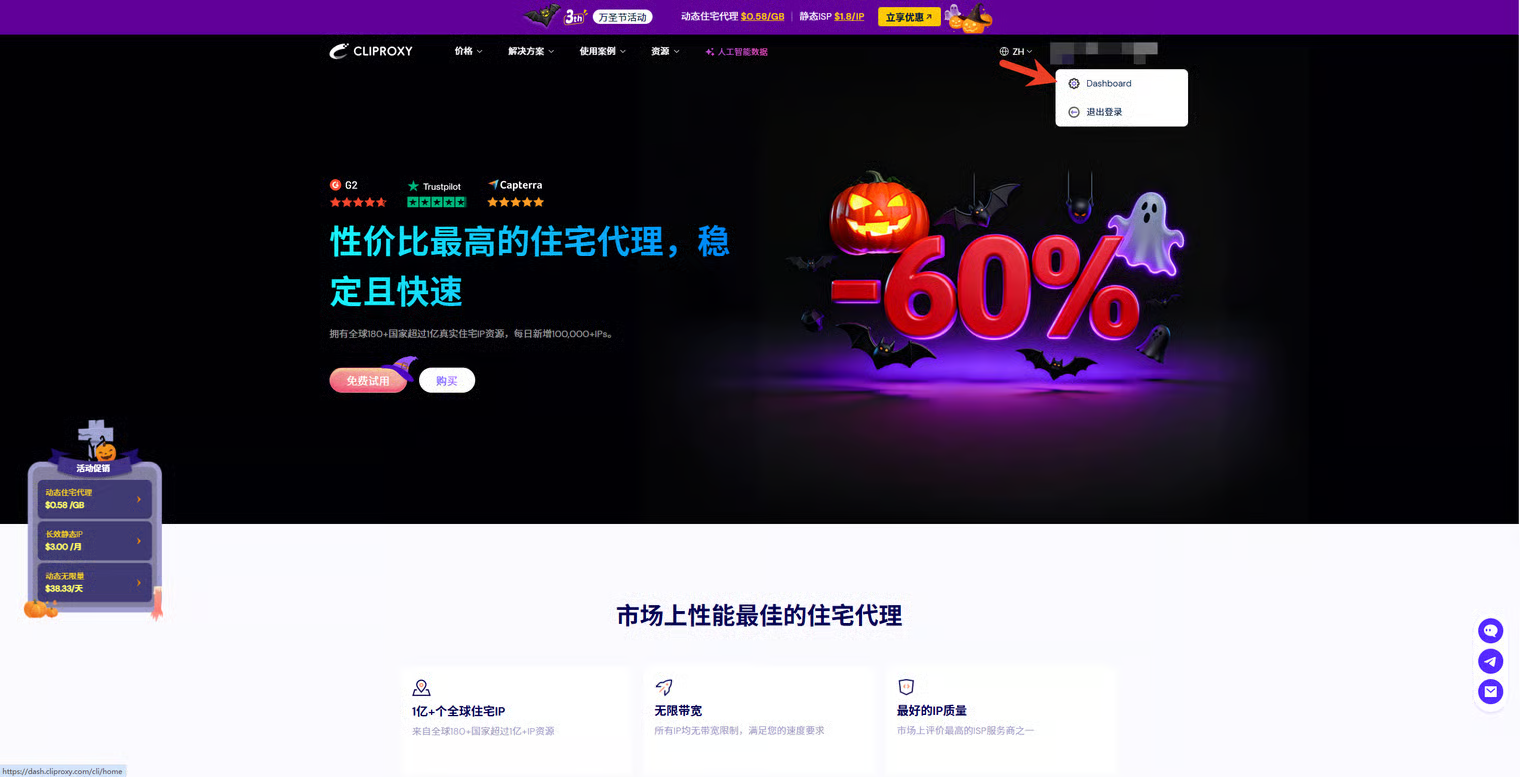
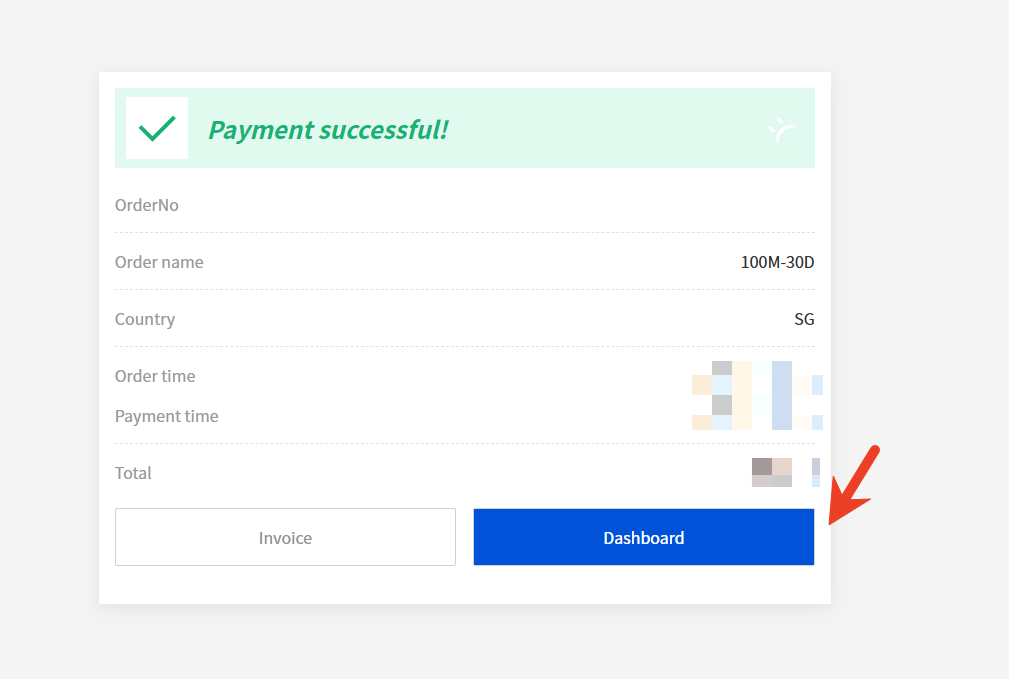
一、Register and log in, then go to the package page to purchase unlimited residential proxy - bandwidth. After the purchase is completed, enter the console menu and click "Unlimited" to view the purchased packages. Currently, Cliproxy supports validity periods of 3 hours, 1 day, 7 days, and 30 days. You can choose the bandwidth and validity period according to your own needs. If you have higher requirements, you can choose to customize the package. If you have any questions, please contact our customer service promptly.After purchase, a purchase voucher will pop up on the page. Click on this page to purchase the voucher and it will directly redirect you to the designated purchase package page.
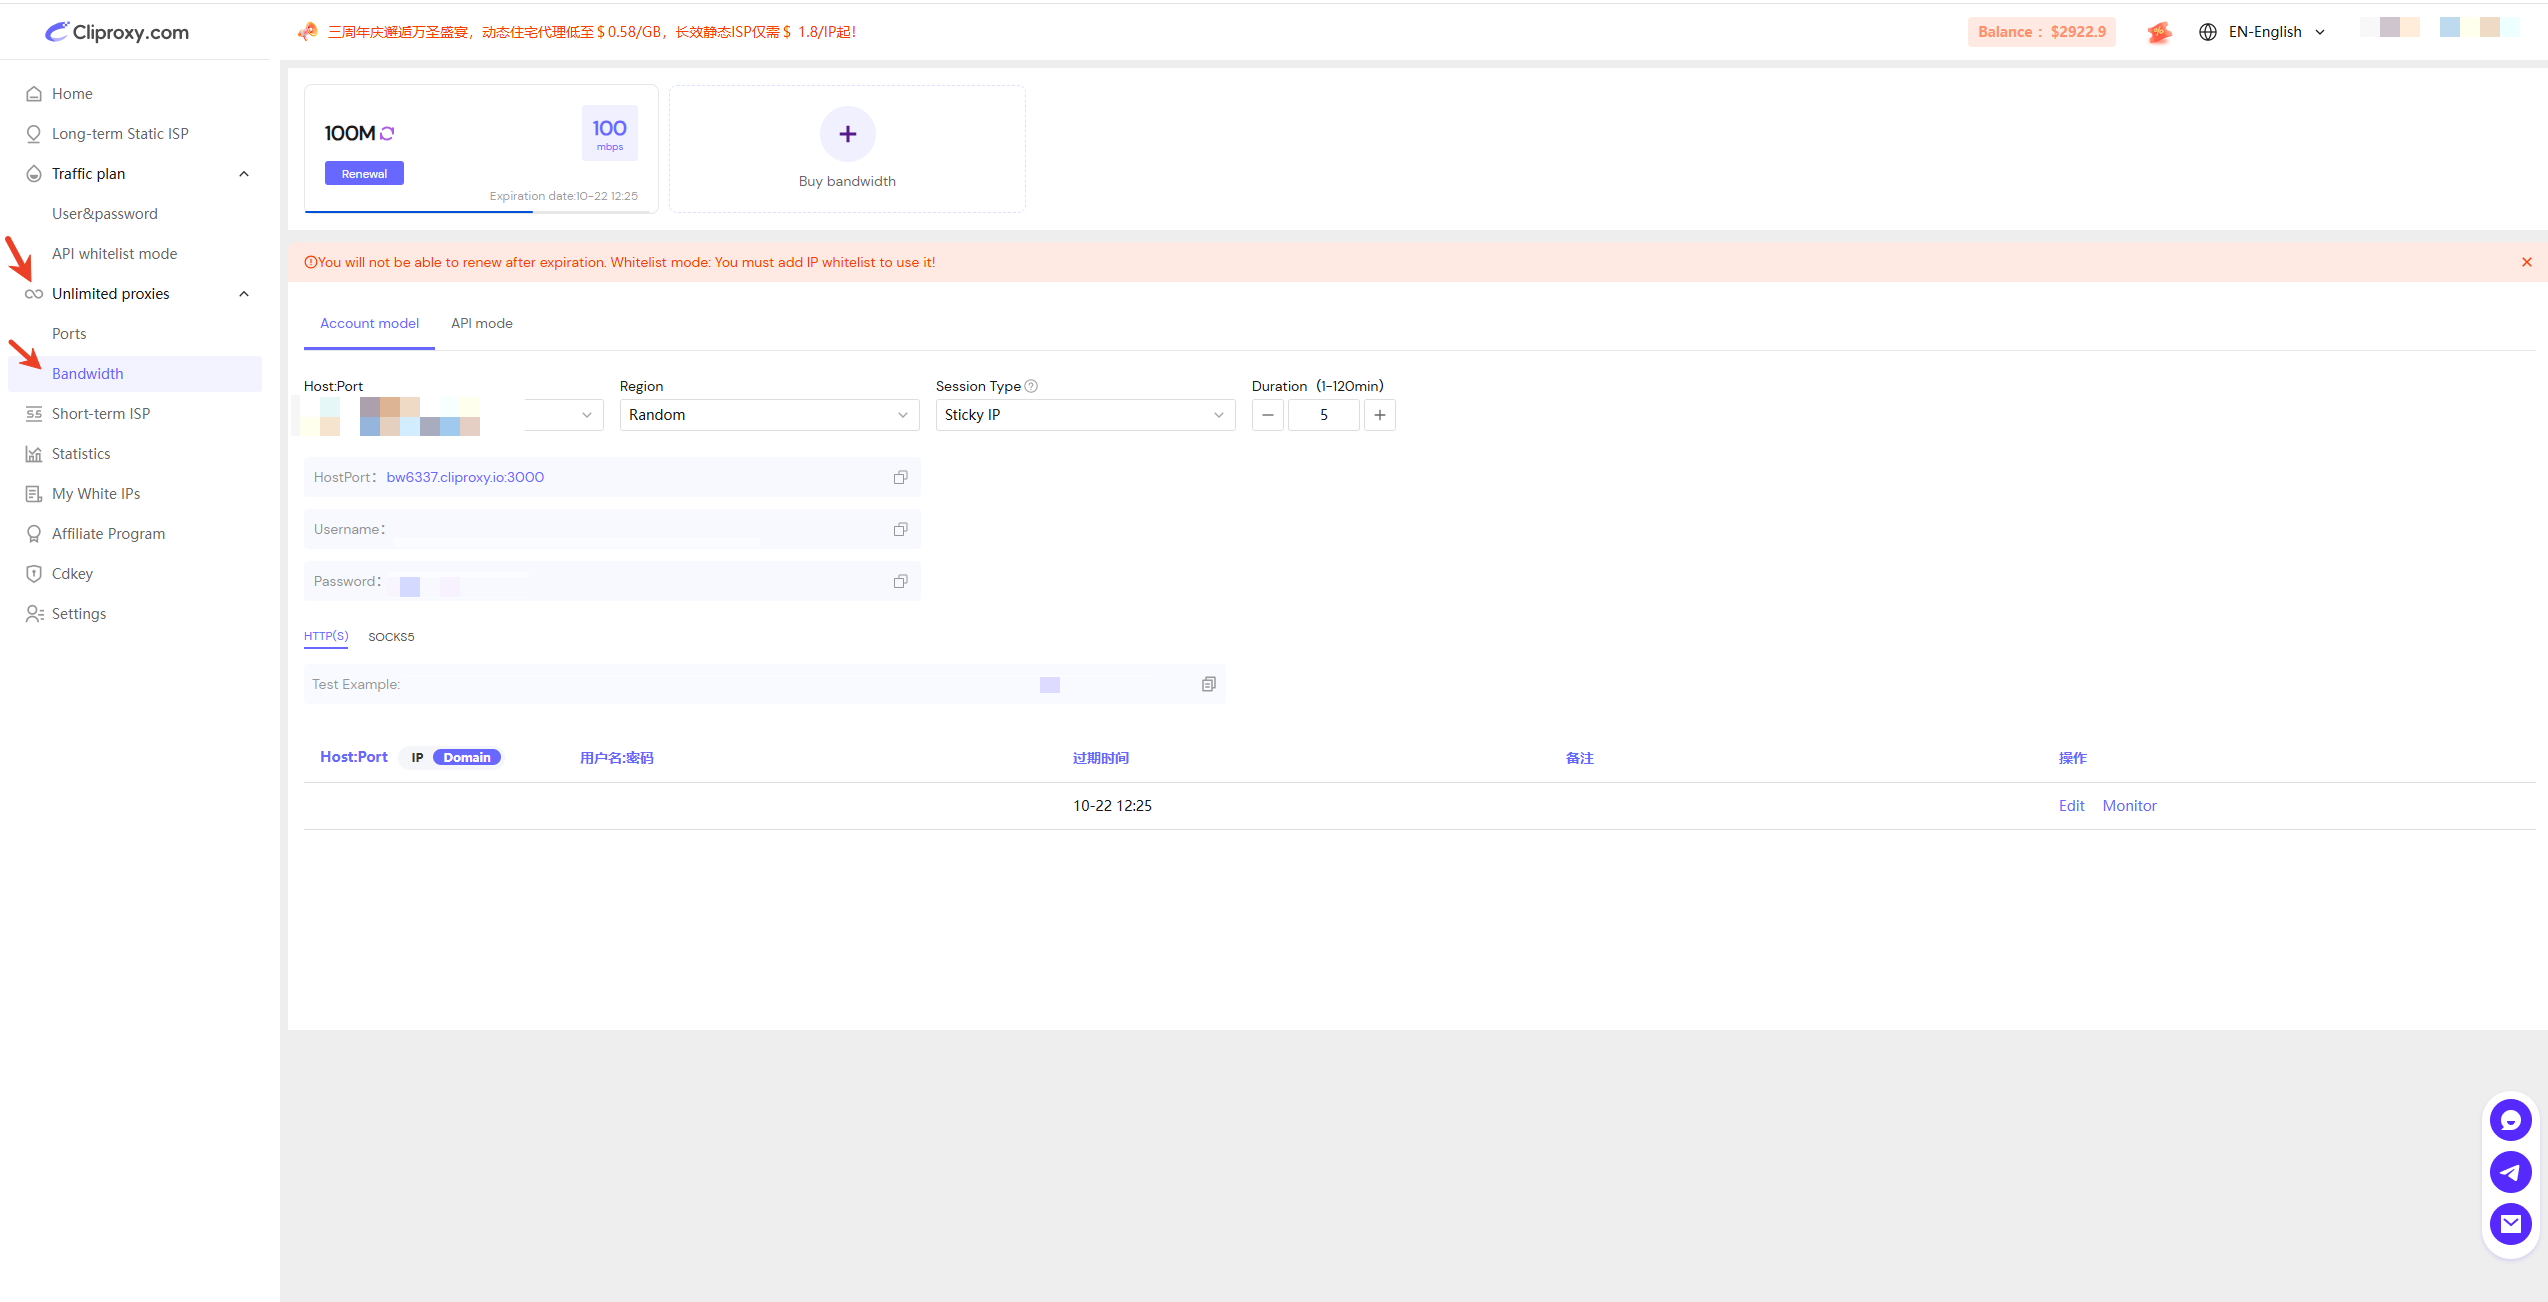
二、Select the required hostname: port, country/region, session type. Among the session types, there are two: Sticky IP (sticky IP) and Rotating IP (rotating IP). Sticky IP (sticky IP): The destination IP will not change within the specified time. After exceeding the set time, the IP will automatically be changed to another IP under the same conditions. The same IP address can support a session for up to 120 minutes. Rotating IP (rotating IP): Each request will use a new IP to access the destination addres.
三、Select HTTP(S)/SOCKS5 from the options below and test in the "Command Prompt (cmd)" to see if it can be used normally.
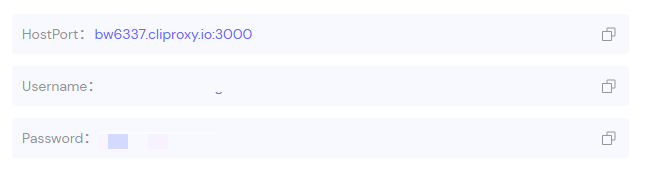
四、 When using, simply copy the necessary host name, port, username, and password information required for the proxy and configure it in the fingerprint browser or any program that supports HTTP or Socks5 proxy.
# Unlimited Proxy Tutorial - Ports
# Account Password Mode
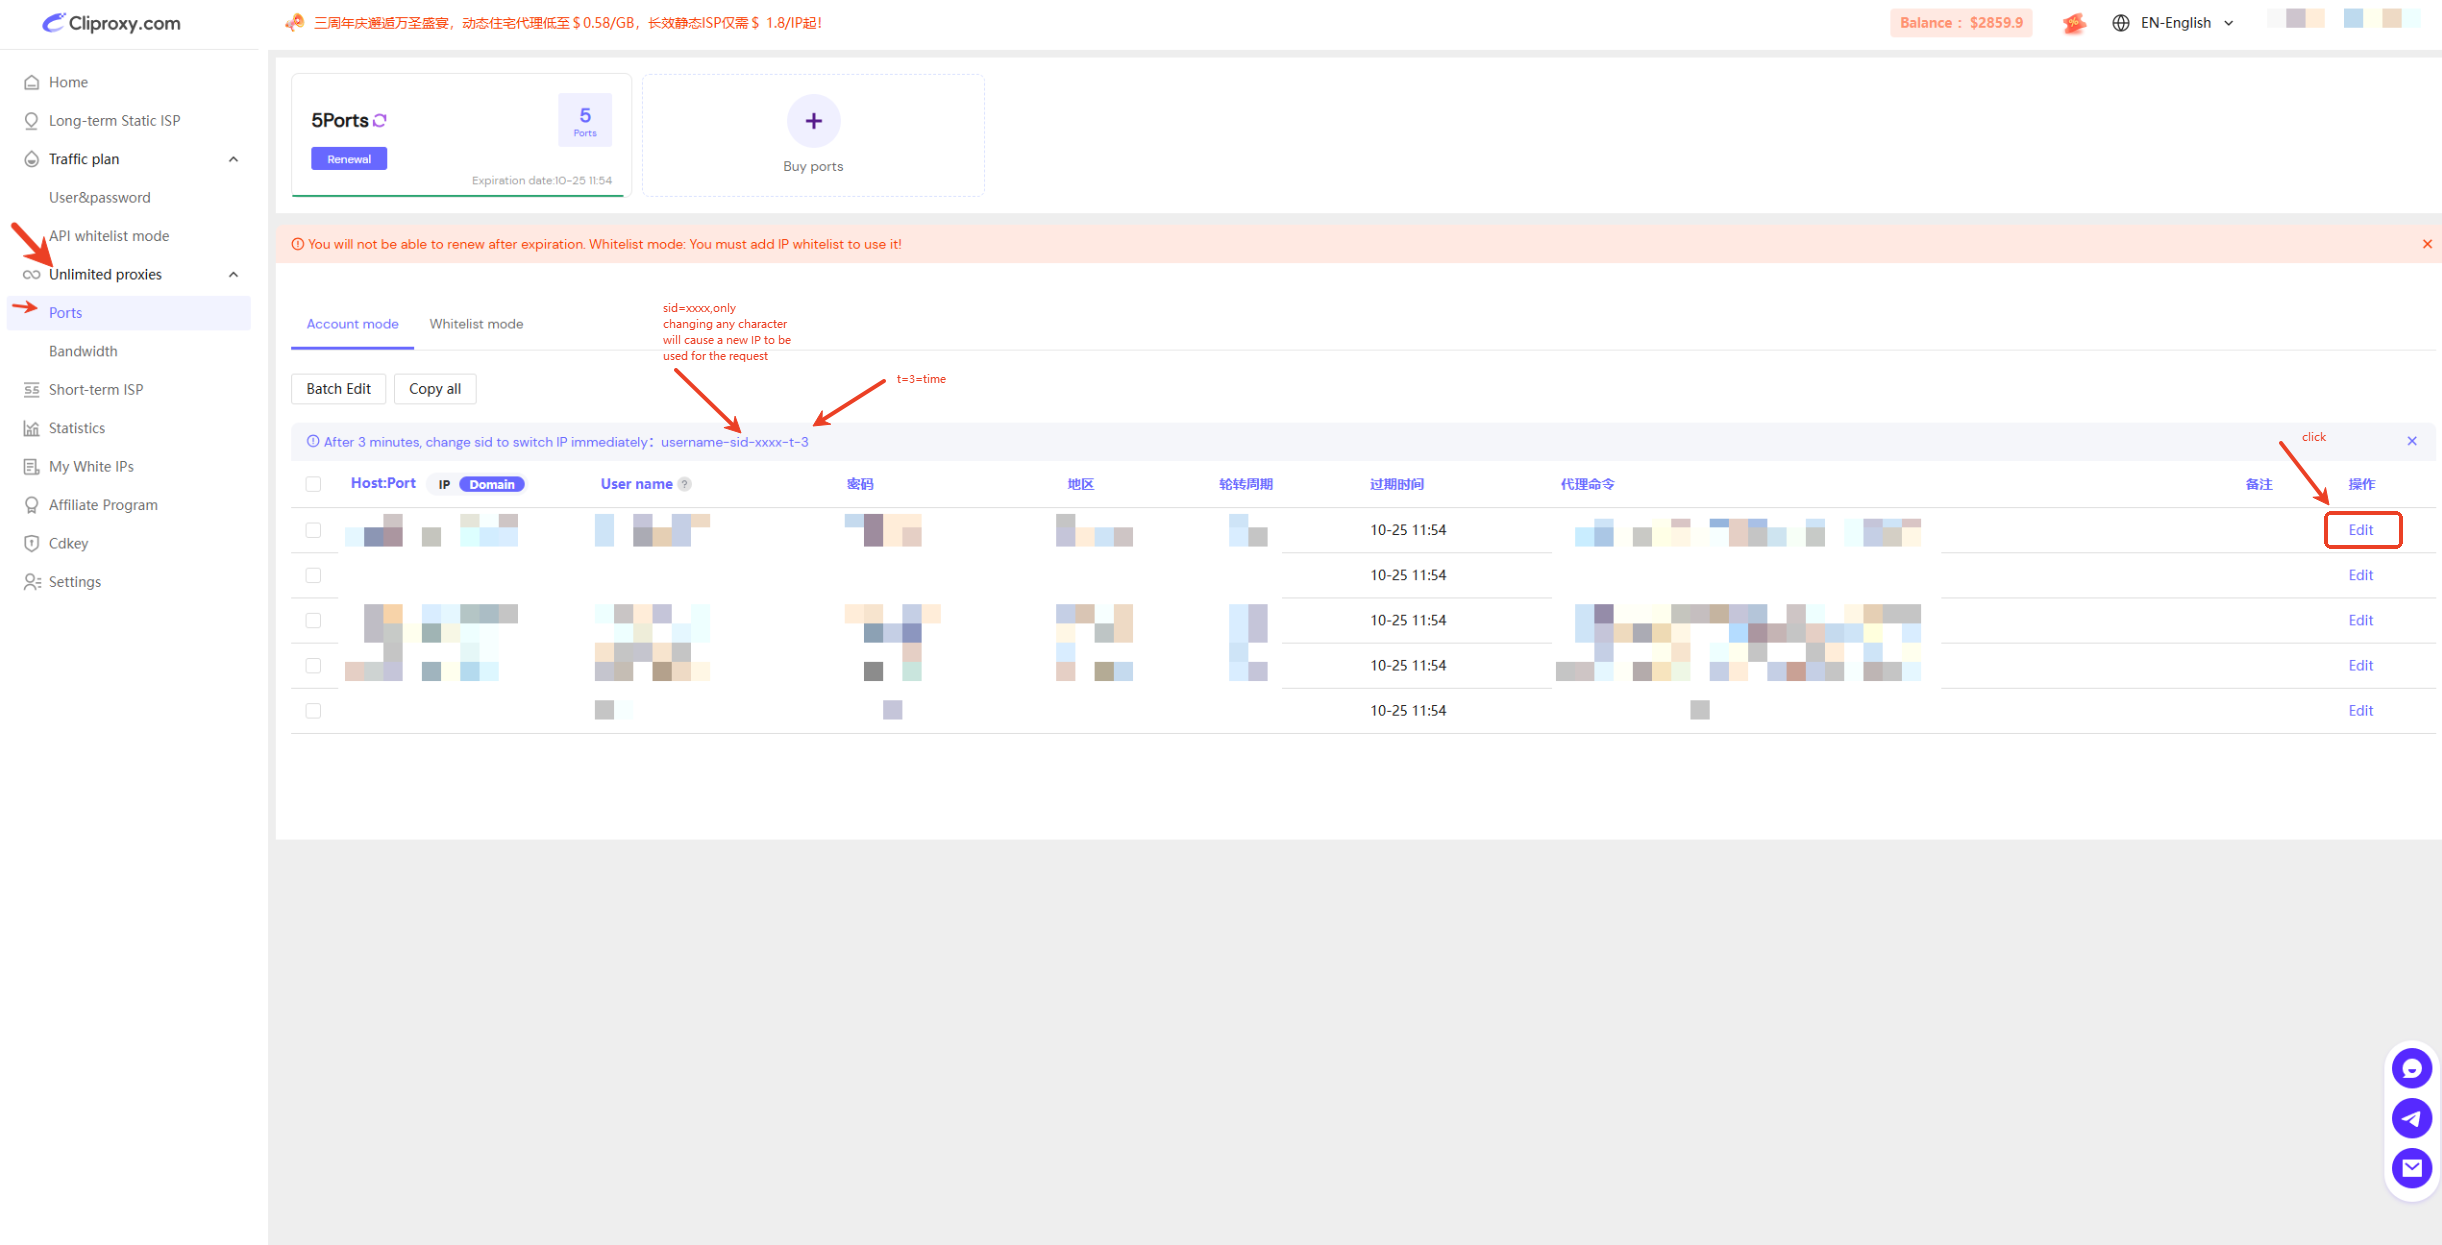
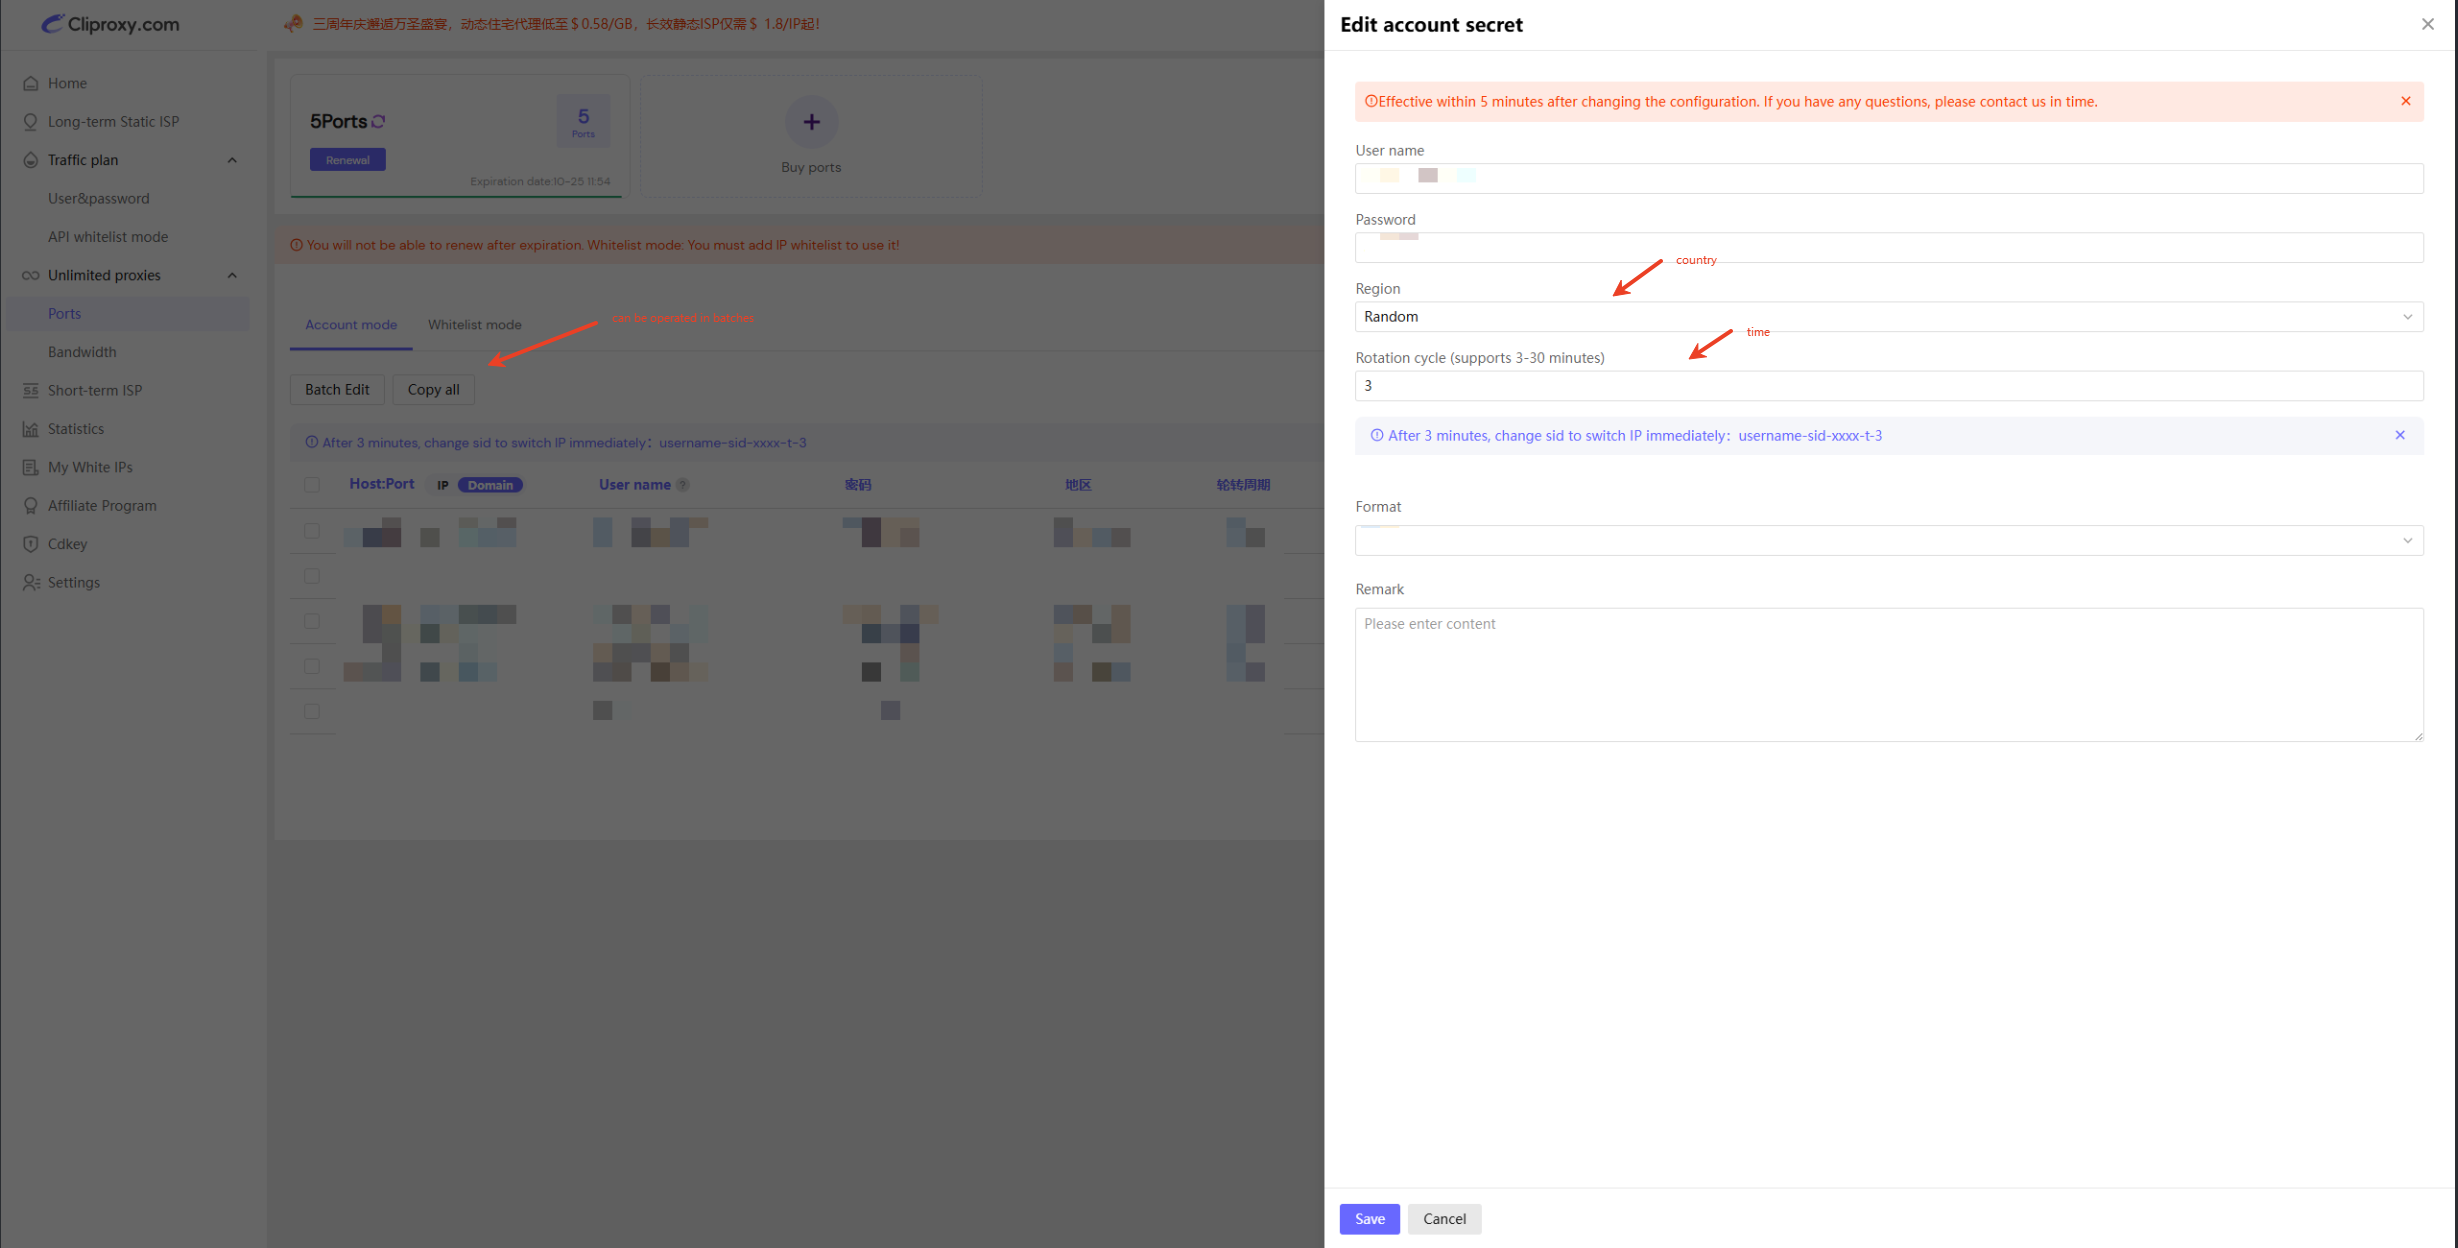
一、Register and log in, then go to the package page to purchase the unlimited residential proxy - port. After the purchase is completed, enter the console menu and click "Unlimited" to view the purchased packages. Currently, Cliproxy supports validity periods of 3 days, 7 days, and 30 days. You can choose the port and validity period according to your own needs. If you have higher requirements, you can choose to customize the package. If you have any questions, please contact our customer service promptly. After purchase, a purchase voucher will pop up on the page. Click the purchase voucher on this page to directly jump to the designated page for purchasing the package.
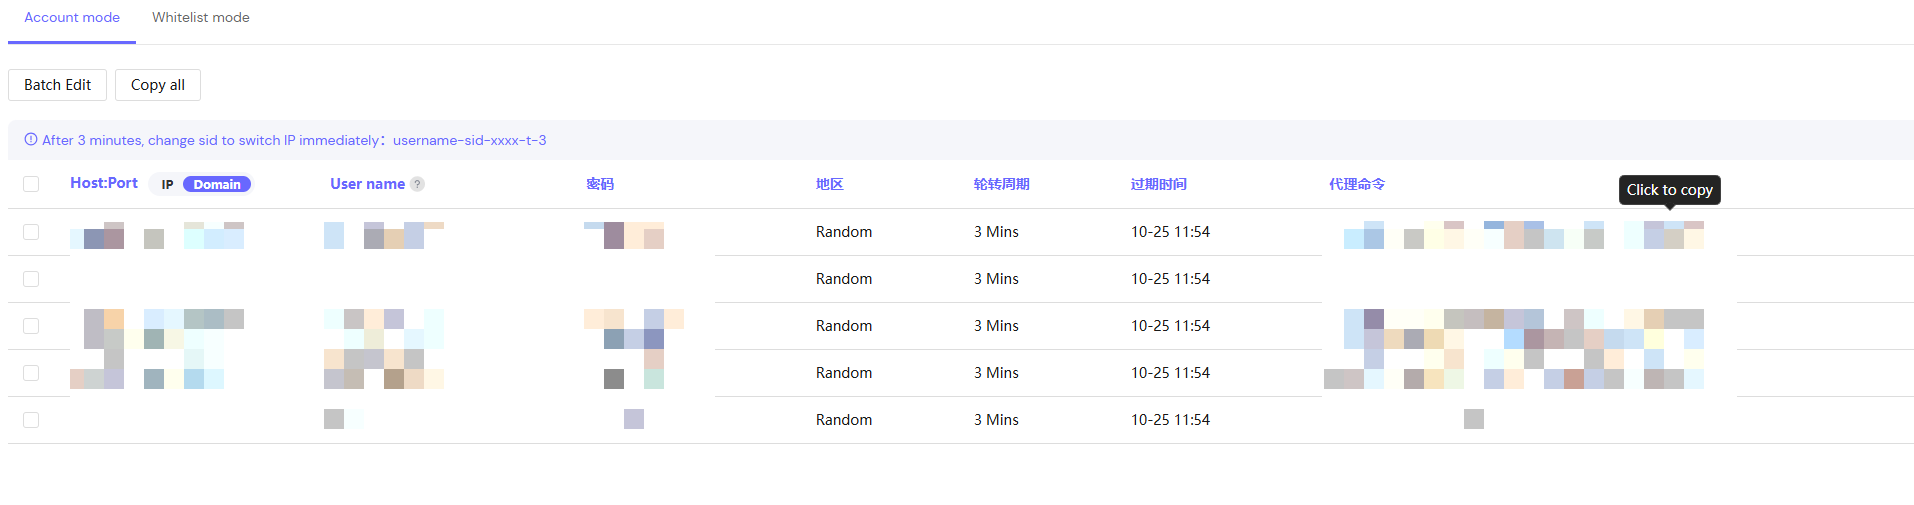
二、Click "Edit", set the required username, password, country/region, rotation cycle, and format. Then click "Confirm Modification".
三、During use, simply copy the host name: port, username, password or the proxy command, and paste it into the fingerprint browser or any program that supports HTTP or Socks5 proxy.
# White List Mode
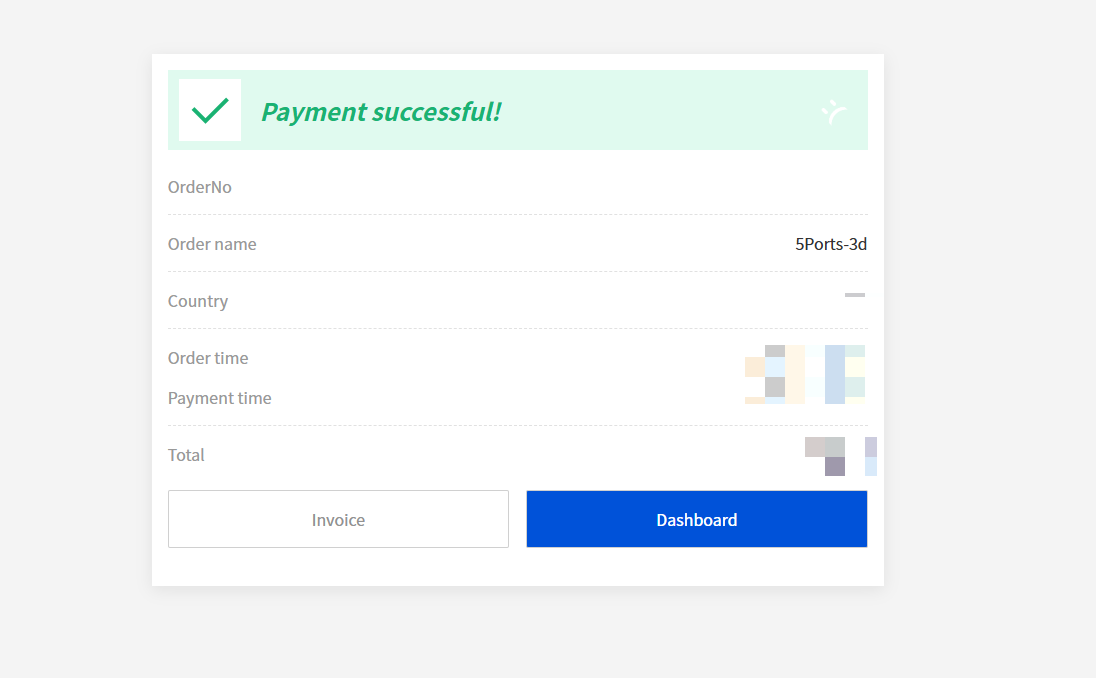
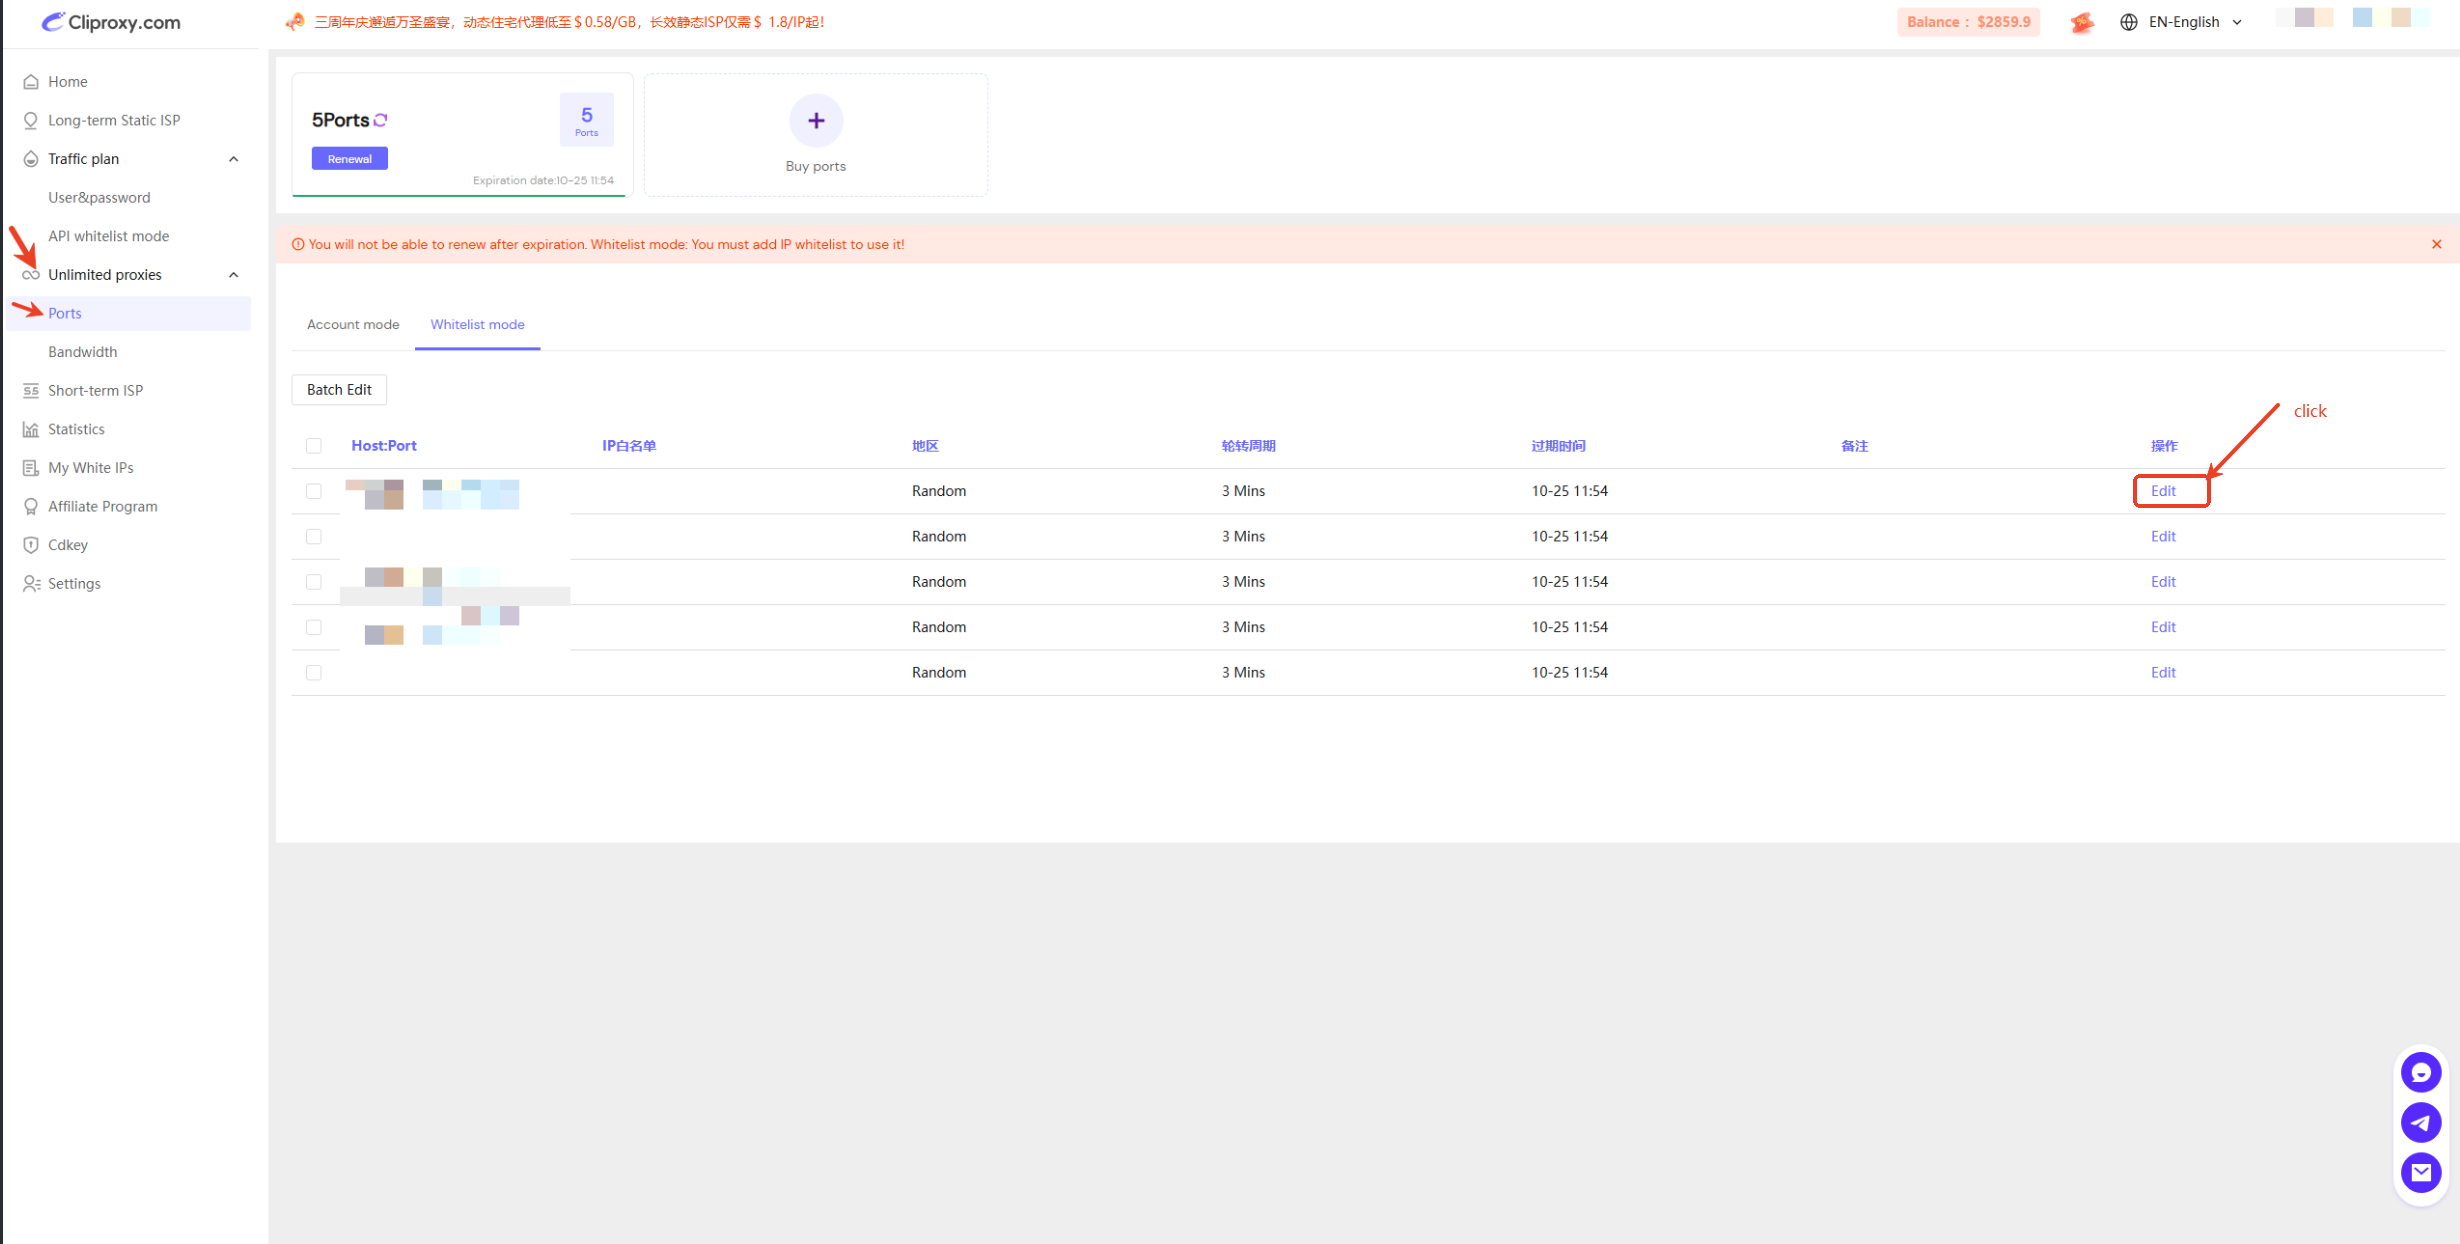
一、Register and log in, then go to the package page to purchase the unlimited residential proxy - port. After the purchase is completed, enter the console menu and click "Unlimited" to view the purchased packages. Currently, Cliproxy supports validity periods of 3 days, 7 days, and 30 days. You can choose the port and validity period according to your own needs. If you have higher requirements, you can choose to customize the package. If you have any questions, please contact our customer service in time. After purchase, a purchase voucher will pop up on the page. Click the purchase voucher on this page to directly jump to the designated page for purchasing the package.
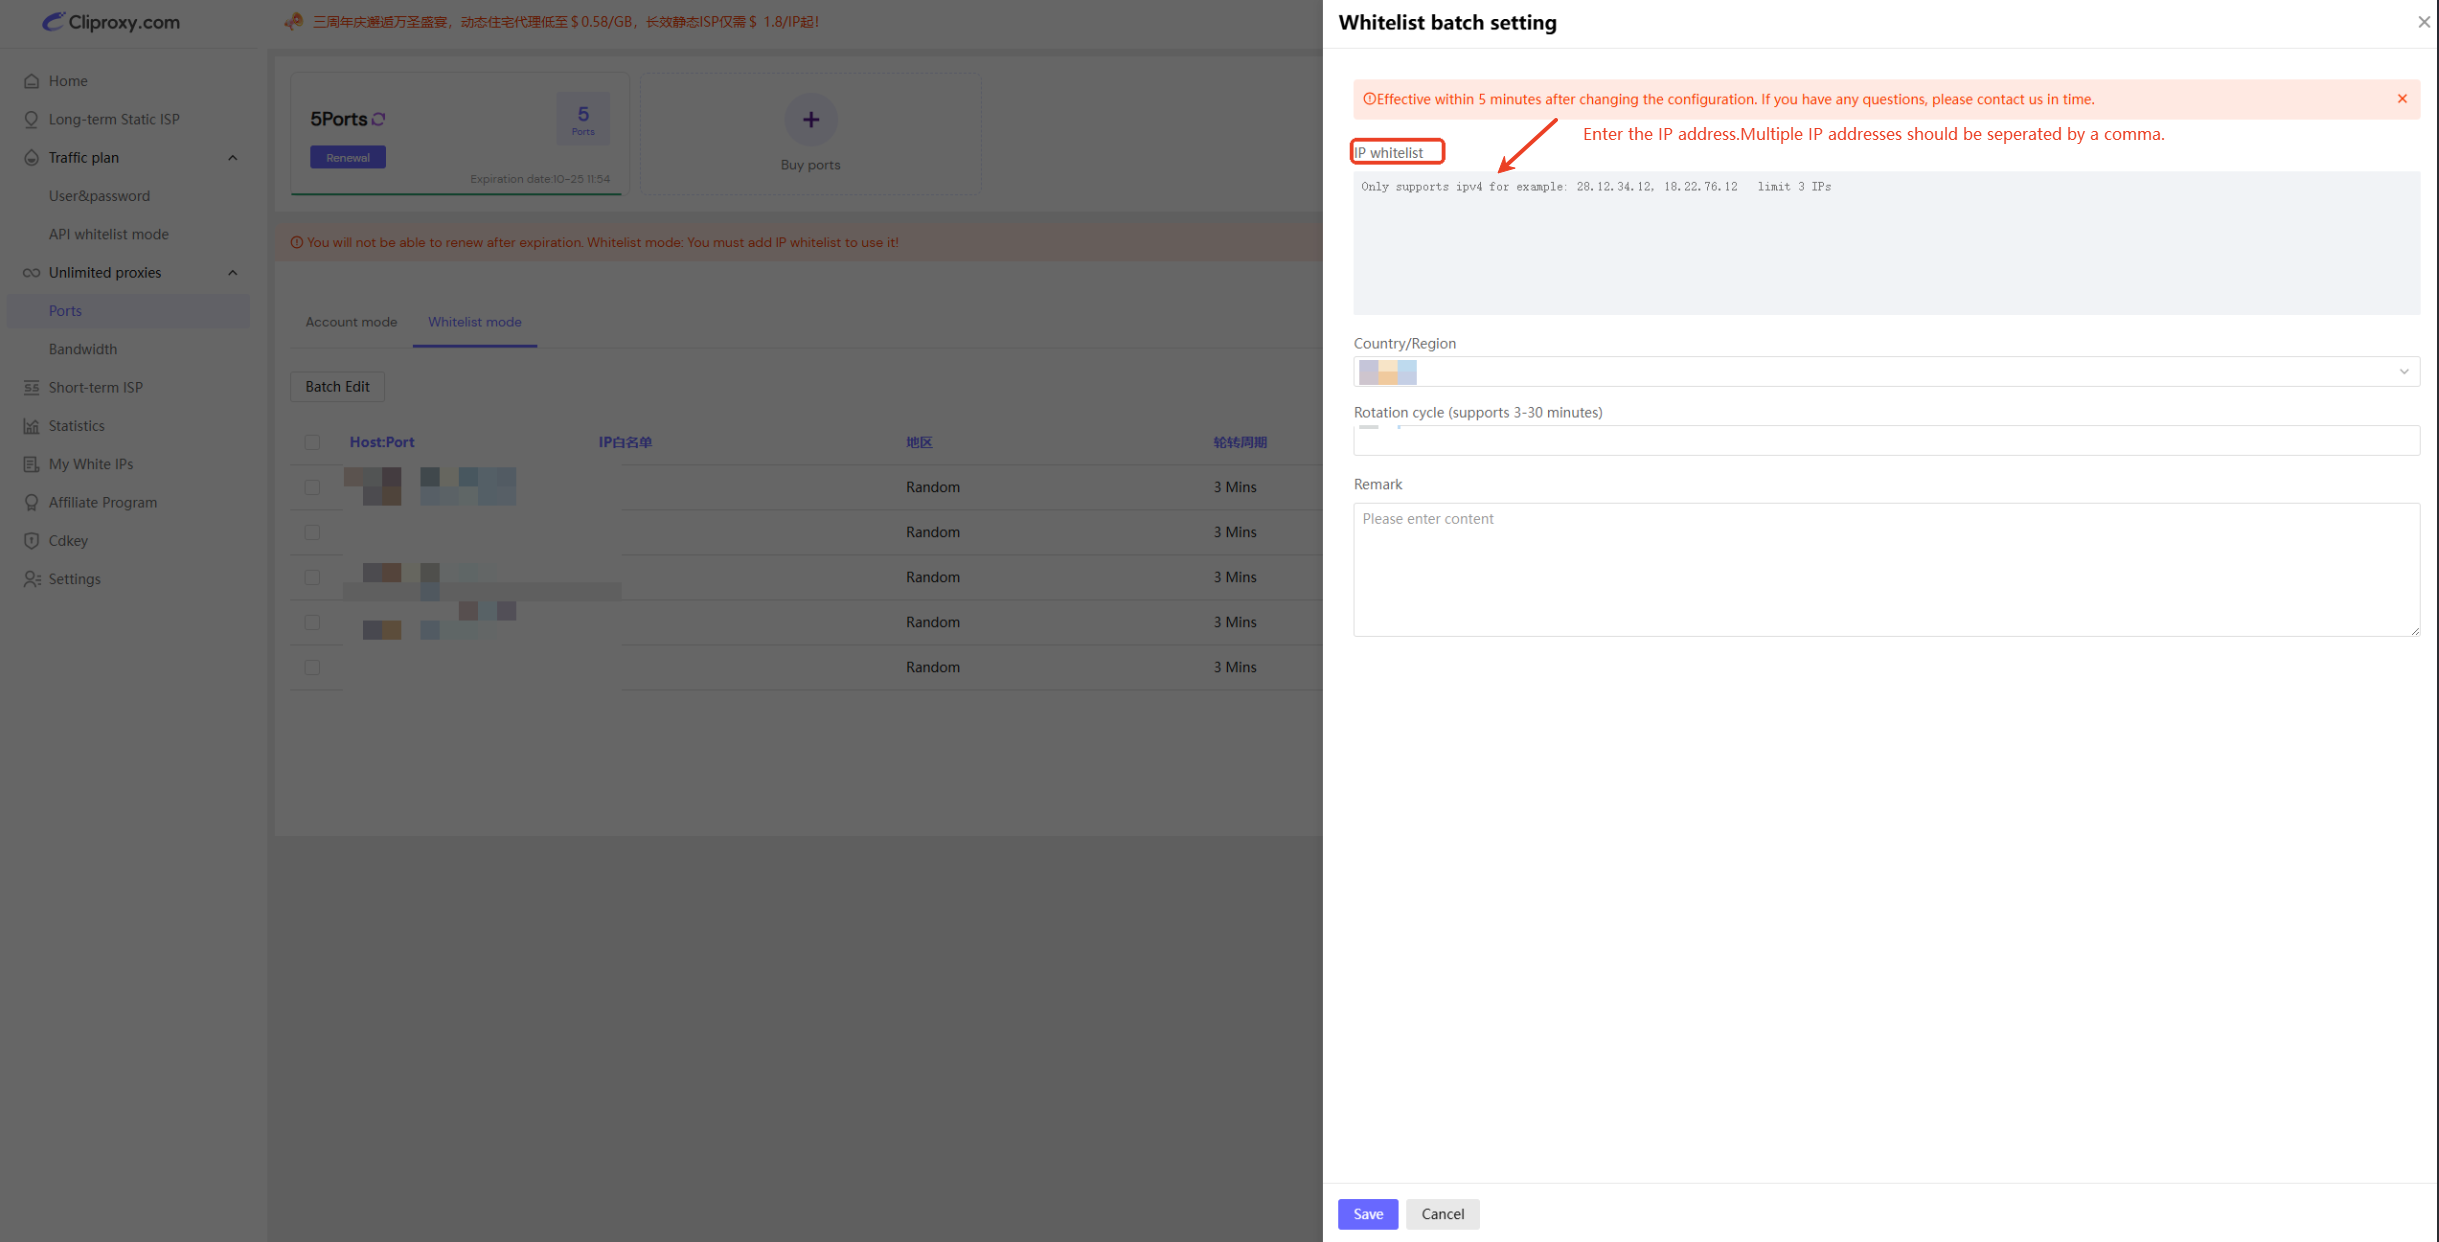
二、Click "Edit", enter the IP addresses that need to be authorized (support batch addition; multiple IPs should be separated by commas), and then click "Save".
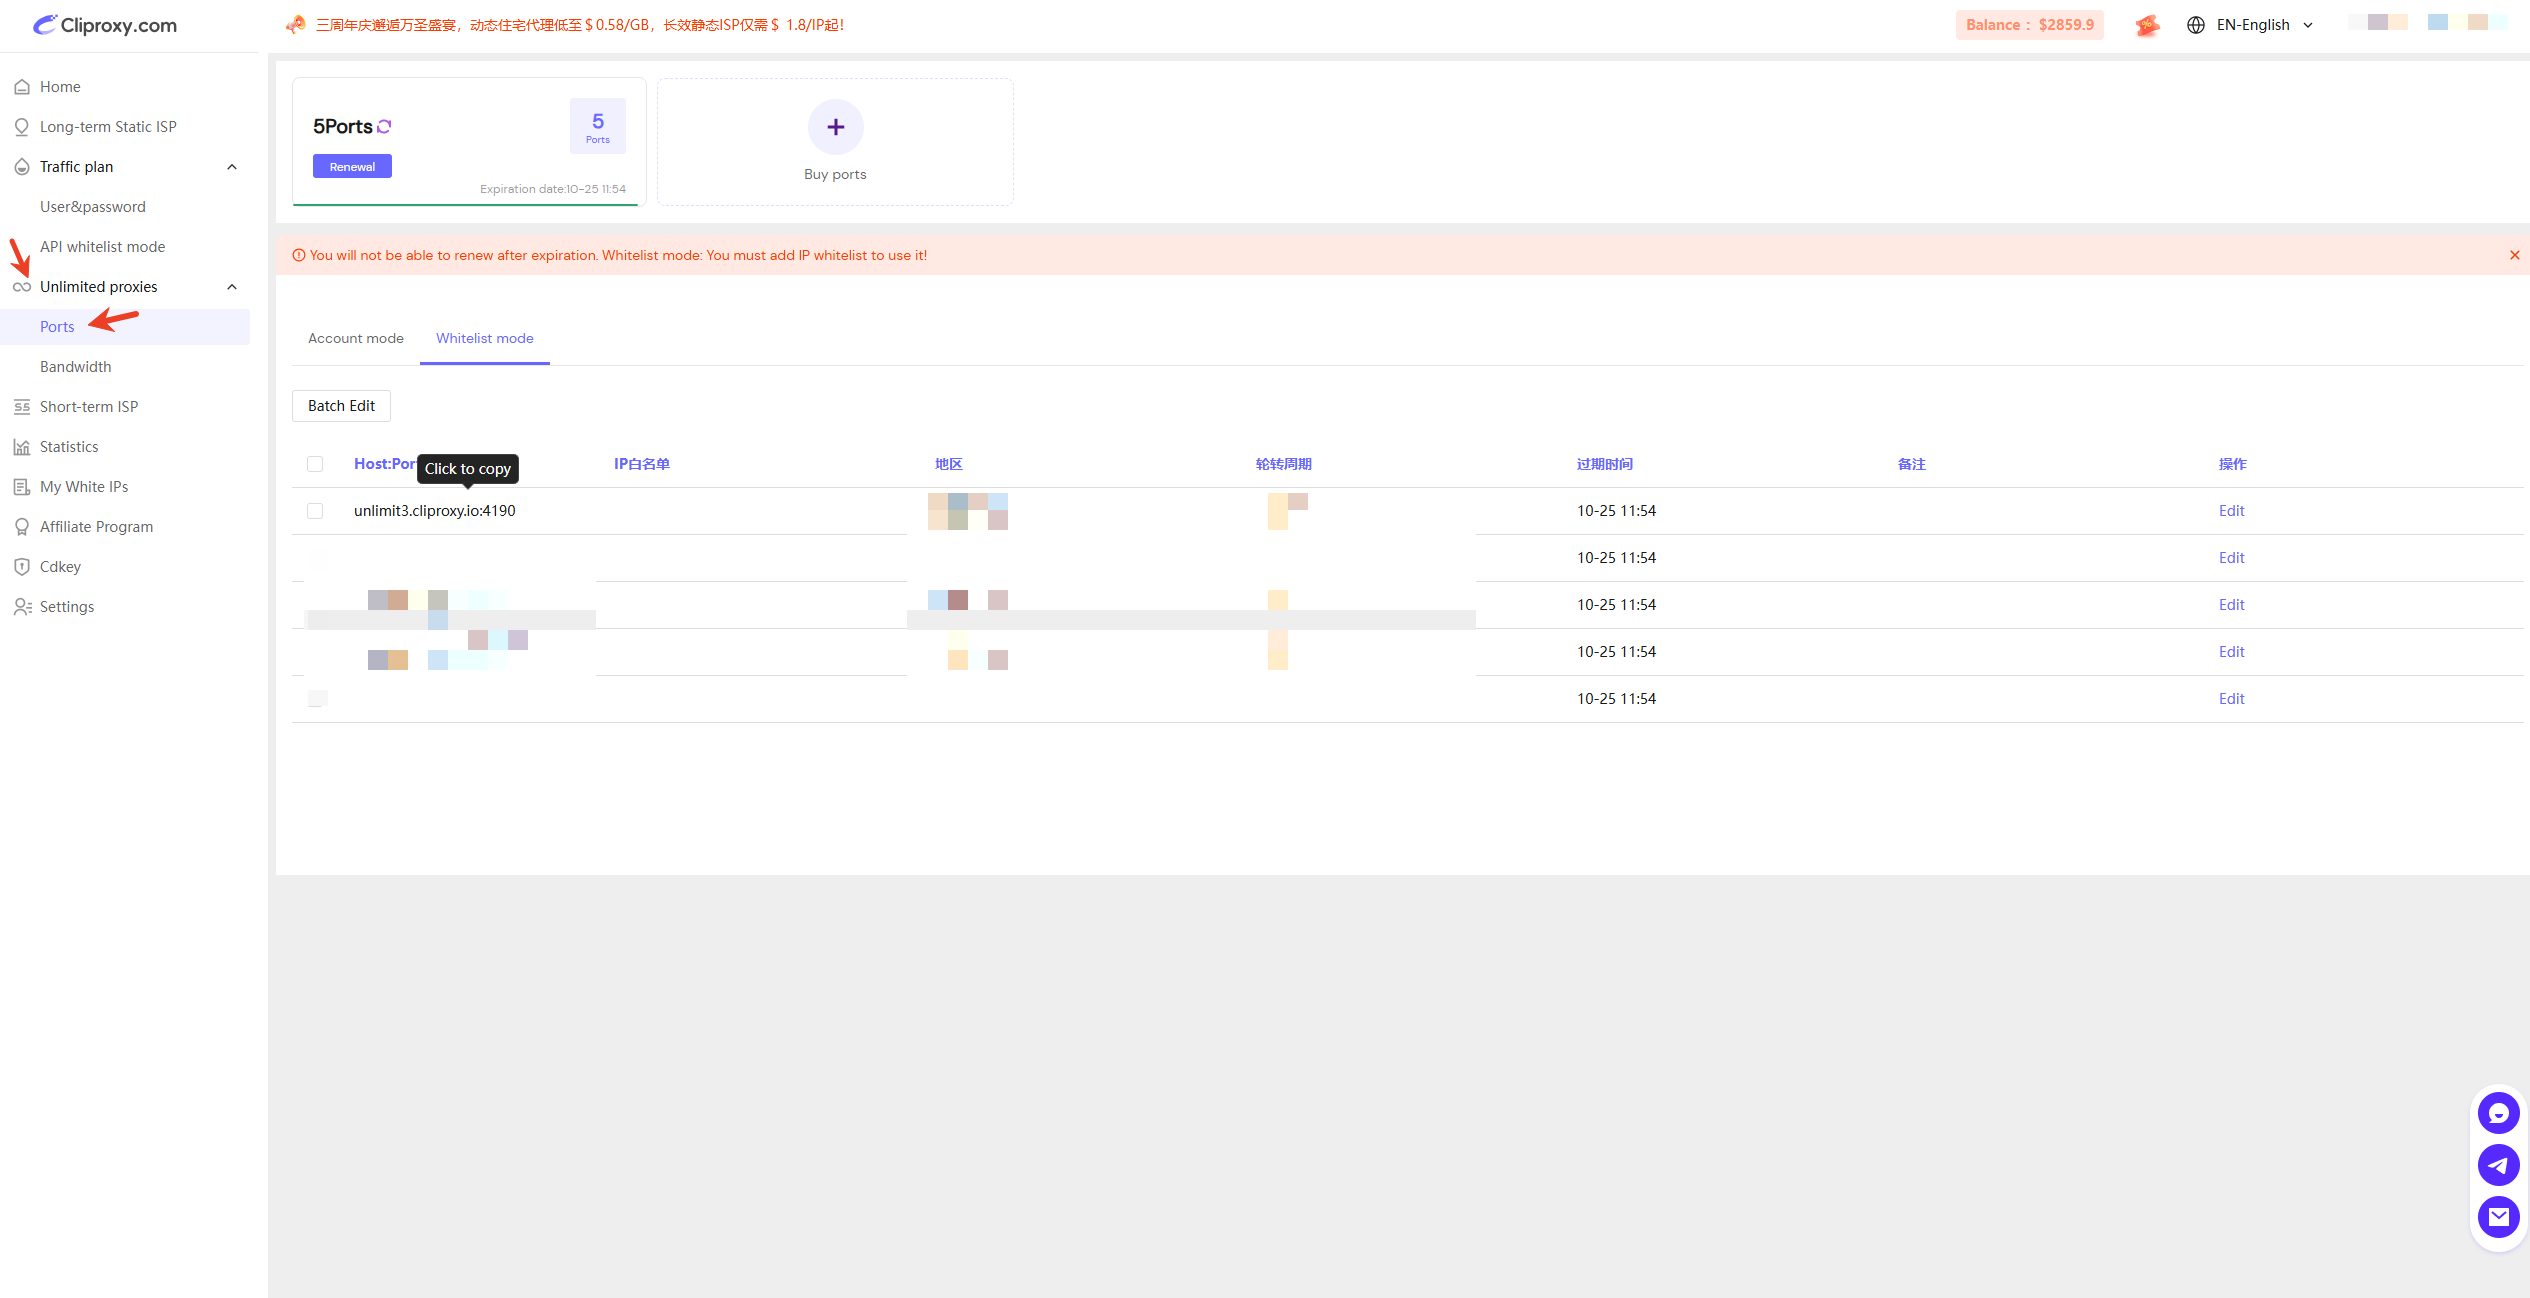
三、The added whitelist IPs do not require verification of usernames and passwords. They can be used to access the proxy by simply configuring the hostname and port.
# 概述
**歡迎使用**[**Cliproxy**](https://cliproxy.com/)
**Cliproxy**是一个专为用户提供高匿名性和安全性的代理服务平台。通过其全球代理网络,用户可以获得不同类型的代理(包括 **住宅IP**、**数据中心IP** 等),以便用于网络爬虫、数据抓取、广告测试、SEO优化、社交媒体管理等多种用途。**Cliproxy** 提供了强大的 IP 代理池、灵活的代理配置和易于使用的 API 接口,旨在帮助企业和个人绕过地域限制、避免IP封禁,并保护在线隐私。
**快速使用Cliproxy**
* [**Web**账密模式(流量计划)](/zh/traffic/using-setup)
* [如何使用账密或白名单模式使用静态IP](/zh/static/used)
**如何利用IOS和Android系统自带功能使用Cliproxy**
* [IOS如何使用Cliproxy](/zh/faq/cliproxy-faq4)
* [Android如何使用Cliproxy](/zh/faq/cliproxy-faq3)
**常见问题**
* [如何验证代理是否有效](/zh/faq/cliproxy-faq1)
* [为什么出口IP和选择的不一样](/zh/faq/cliproxy-faq9)
* [Cliproxy支持哪些IP代理协议](/zh/faq/cliproxy-faq8)
# 流量计划教程
通过有价格优惠的流量包套餐能节省很多流量成本,适用于数据抓取、批量获取接口数据等大规模数据请求且不需要额外加载静态资源的代理场景
# 账密模式
1.进入操作台(Dashboard)
2.选择相对应的国家、州省、城市、会话类型等条件,其中会话类型有Sticky IP(粘性IP)和Rotating IP(轮转IP)两种类型
**Sticky IP**(粘性IP):在规定**时间内**目的IP**不**会**更改**,当超过设定时间后IP自动更改为同条件下其他IP,同一IP地址可支持长达120分钟会话。
**Rotating IP**(轮转IP):**每次**请求都会用一个**新**的**IP**访问目的地址
3.选择转发机器(**主机名:端口**)和用户名,不同地区的转发机器对于代理效果有不同的影响,通常选择距离目的IP较近的地区或者距离使用代理的用户所在地较近的地区
4.设定完转发机器及用户名后,可以根据下方测试命令在“**命令提示符**”中测试是否可以正常使用Cliproxy
5.**复制**代理所需的**主机**:**端口**、**用户名**、**密码**具体信息配置在指纹浏览器或支持HTTP、Socks5代理的程序里即可。
6.如果考虑多实例并发运行,则可以根据实际场景设置生成多个代理信息,未使用不额外扣费
# 子账号设置
在高并发执行任务、多场景、员工管理等实际需求下,子账户的逻辑显得尤为关键。
根据业务需要创建子账号需注意以下几点
1.账号密码都必须满足6-22位且包含数据和字母的组合
2.分配的流量不得高于当前账号下流量剩余总量
3.为避免账号丢失、被盗窃等情况,建议定时更改子账号信息
# 静态IP代理
静态IP(Static IP)是一种固定的、不会改变的IP地址。与动态IP地址不同,静态IP地址在分配给某个设备(如计算机、服务器或路由器)后,不会随着时间的推移而变化。静态IP地址通常由网络管理员或互联网服务提供商(ISP)分配,并且该IP地址在设备重新启动或断开连接后仍然保持不变。
#### 静态IP的特点:
1. **固定不变**:一旦分配给某个设备,静态IP地址不会自动更改,除非网络管理员手动修改。
2. **稳定性**:因为地址不变,静态IP适用于需要长期稳定通信的服务,如网站服务器、邮件服务器等。
3. **易于管理**:对于需要远程访问的设备,静态IP可以简化网络配置和管理。比如,你可以使用静态IP设置防火墙规则,或者设置域名解析。
4. **需要配置**:静态IP需要网络管理员手动配置,并且通常需要通过 ISP 获取,或者在本地网络中由管理员设置。
# 如何选购静态长效ISP
1.进入操作台(Dashboard)
2.进入左侧“静态长效ISP”导航栏,点击“购买其他地区”
3.选择有效期、国家地区、购买数量
4.选择支付方式并支付
# 如何提取并使用静态长效ISP
1.进入操作台(Dashboard)
2.进入左侧“静态长效ISP”导航栏,如果没有静态余额请先[购买](https://cliproxy.com/pricing/static-isp/)
3.选择需要提取的IP,点击“提取”按钮
4.已经提取的IP会出现在下方使用记录里,如果你不想通过用户名、密码进行认证,可以通过[白名单模式](/zh/static/whitelist)把你当前IP加入白名单列表,从而只需要配置服务器地址和端口就可以使用Cliproxy的静态长效IP
# 如何通过白名单模式使用静态长效ISP
1.进入左侧“白名单管理”导航栏,并点击“添加白名单”
2.支持批量添加,多个IP通过逗号分割
3.通过已添加的白名单IP链接静态IP则无需进行用户名和密码的校验,你只需要配置IP和端口即可使用Cliproxy的代理。
# 指纹浏览器如何使用
指纹浏览器(Fingerprint Browser)是一种用于保护用户隐私、掩盖网络行为或绕过某些限制的工具。其核心概念是浏览器指纹(Browser Fingerprint),即根据浏览器及设备的一些独特信息(如设备型号、操作系统、浏览器版本、语言、屏幕分辨率等)生成的一个“指纹”,通过这种方式可以唯一标识用户。指纹浏览器的主要作用是伪造或隐匿用户的真实浏览器指纹,以此达到保护隐私、反追踪的目的。
* [AdsPower指纹浏览器如何使用Cliproxy](/zh/browser/adspower)
* [比特浏览器如何使用Cliproxy](/zh/browser/bit)
* [候鸟防关联浏览器如何使用Cliproxy](/zh/browser/mbbrowser)
* [Mulogin指纹浏览器如何使用Cliproxy](/zh/browser/mulogin)
* [ixBrowser指纹浏览器如何使用Cliproxy](/zh/browser/ixbrowser)
* [如何在拉力猫指纹浏览器中配置Cliproxy代理](/zh/browser/lalicat)
* [如何在VMLogin指纹浏览器内配置Cliproxy代理](/zh/browser/vmlogin)
* [如何在Undetectable中配置Cliproxy代理](/zh/browser/undetectable)
* [如何在Dolphin Anty中配置Cliproxy代理](/zh/browser/dolphin)
* [如何在NestBrowser中配置Cliproxy代理](/zh/browser/nestbrowser)
* [如何在MoreLogin中使用Cliproxy代理](/zh/browser/morelogin)
* [如何在Linken Sphere中使用Cliproxy代理](/zh/browser/linkensphere)
# AdsPower指纹浏览器如何使用Cliproxy
**1.打开AdsPower,点击左上角“新建浏览器”,在右侧代理信息栏选择代理类型,其中可以选择HTTP或Socks5,Cliproxy支持HTTP和Socks5两种代理类型**
**2.根据Cliproxy配置对应的“主机:端口”、“代理账号”、“代理密码”信息,点击“检查代理”会出现测试结果。**
* [**流量套餐**如何获取**“主机:端口”、“代理账号”、“代理密码”** 信息](/zh/traffic/using-setup)
* [**静态长效ISP**如何获取**“主机:端口”、“代理账号”、“代理密码”** 信息](/zh/static/used)
**3.添加完环境后主页会增加一条记录,点击右侧“打开”按钮则会开启一个新的浏览器窗口**
**如果遇到任何问题,请按照以下步骤进行故障排查:**
**1.**检测本地网络环境**,确认网络环境正常**
**2.**检测系统代理**,如果系统代理链接失败请勿勾选下方“使用系统代理链接代理”**
# 比特浏览器如何使用Cliproxy
**1.打开比特浏览器,在左侧导航栏选择浏览器窗口,点击左上角“新建窗口”,在右侧代理信息栏选择代理类型,其中可以选择HTTP或Socks5,Cliproxy支持HTTP和Socks5两种代理类型**
**2.根据Cliproxy配置对应的“代理主机”、“代理端口”、“代理账号”、“代理密码”信息,点击“代理检测”会出现测试结果。**
**3.添加完窗口后主页会增加一条记录,点击右侧“打开”按钮则会开启一个新的浏览器窗口**
# 候鸟防关联浏览器如何使用Cliproxy
**1.打开候鸟浏览器,点击左下角“新建环境配置”,在弹出的二级弹窗里选择代理Proxy,其中可以选择HTTP或Socks5,Cliproxy支持HTTP和Socks5两种代理类型**
**2.根据Cliproxy配置对应的“主机:端口”、“代理账号”、“代理密码”信息,点击“检查代理”会出现测试结果。**
**3.添加完环境后主页会增加一条记录,点击右侧“运行”按钮则会开启一个新的浏览器窗口**
# Mulogin指纹浏览器如何使用Cliproxy
Mulogin通过模拟用户的指纹(例如浏览器指纹、屏幕分辨率、操作系统、语言设置等)来提升隐私性。
1、进入cliproxy官网,点击右上角登录,如没有账号,请点击注册,完成账号注册流程。
2、输入你的账号进入cliproxy的官网
3、本文以为Socks5为例,选择您提取IP的目标国家地区街道,最后选择红箭头的【Connect】
4、点击【Copy】完成IP的复制
5、进入MuLogin指纹浏览器新建1个浏览器窗口,并自定义浏览器配置 (新用户免费体验3天)
6、更改你的窗口参数配置,以此来使用cliproxy的代理IP
7、将你复制的代理IP粘贴到对应栏,点击【保存】
立即使用[Mulogin](https://www.mulogin.com/?ref=cliproxy)
# 如何在ixBrowser指纹浏览器中配置Cliproxy代理
ixBrowser是一款功能强大、永久免费的指纹浏览器,适用于多种场景下的多账号管理。
1、登录Cliproxy官网,如果没有账号,请完成注册流程。
2、请在左侧选择需要提取的IP类型(这里以Socks5为例)。然后在【代理池】中选择您的目标国家地区街道信息,点击【查询】,得到你的目标IP列表,最后选择1个合适的IP点击【提取】。
3、在【使用列表】内点击【复制】得到这条IP的主机、端口、账号、密码信息。
4、打开ixBrowser指纹浏览器,并且登录进入;创建1个新的窗口来完成代理的前置配置条件,请按照顺序点击操作,选择合适你的平台和分组等信息(不指定,请按照顺序选择你的业务平台和备注信息),最后点击【代理设置】。
5、进入代理设置,选择代理类型为Socks5,把您复制的IP数据信息粘贴在【代理主机】内。ixBrowser会自动分栏,把您的IP数据一一放置在对应位置。点击【代理检测】检查你的IP信息是否真实可靠(绿色IP信息代表没问题)。最后点击右下角的【立即创建】。
6、点击【打开】,进入当前配置IP的浏览器窗口。
7、可以看到IP更改成功,配置完成。此条IP的质量是极度纯净的家庭住宅IP资源。
立即体验最好的指纹浏览器—[ixBrowser](https://ixbrowser.com/?utm_source=cliproxy)
# 如何在拉力猫指纹浏览器中配置Cliproxy代理
1、打开拉力猫指纹浏览器,点击【添加浏览器】,在右侧的配置菜单中输入您该次业务的【显示名称】,例如视频业务或者其他任何备注信息。最后在下方的【代理设置】内选择Socks5代理类型。
2、依次粘贴从【Cliproxy后台提取IP的相关信息】到对应栏,点击上方【检查网络】,可以看到下方出现了该IP的位置信息,代表当前IP可以配置成功。最后点击下方【保存】。
* [**流量套餐**如何获取**“主机:端口”、“代理账号”、“代理密码”** 信息](/zh/traffic/using-setup)
* [**静态长效ISP**如何获取**“主机:端口”、“代理账号”、“代理密码”** 信息](/zh/static/used)
3、打开该配置成功的窗口
4、可以看到位置更换成功,并且该IP的质量很高,非常适合开展你的业务。
# 如何在VMLogin指纹浏览器内配置Cliproxy代理
1、访问[ VMLogin指纹浏览器](https://www.vmlogin.us)官网,注册账号并领取 3天免费试用。
2、下载并安装 VMLogin客户端,使用已注册的账号登录。
3、在客户端左侧菜单栏,点击 【新建浏览器配置文件】 或进入 【浏览器配置文件】 页面,选择 “创建新配置文件” 以添加新浏览器。
4、在 创建浏览器配置文件 页面,填写 “显示名称” 等基本信息。
5、点击 “设置代理服务器” -> 启用代理服务器。
6、选择代理类型,输入从 Cliproxy 获取的代理信息,或点击 “粘贴代理信息” 一键添加。
7、代理信息添加完成后,点击 “测试代理” ,确保测试成功后保存设置。
* [**流量套餐**如何获取**“主机:端口”、“代理账号”、“代理密码”** 信息](/zh/traffic/using-setup)
* [**静态长效ISP**如何获取**“主机:端口”、“代理账号”、“代理密码”** 信息](/zh/static/used)
8、当所有配置完成后,点击 “保存配置” ,即可开始启动配置文件。
# 如何在Undetectable中配置Cliproxy代理
1、进入Undetectable指纹浏览器,在【新用户配置文件】内输入任何数值,例如Test或者其他任何信息,最后点击下方【创建】。
2、接下来需要添加Cliproxy的代理信息,【代理】选择【新代理】,下方选择【SOCKS5】代理类型,右侧输入框中直接把Cliproxy后台复制的代理信息粘贴到该输入框;最后点击右侧的【检测符号】,可以看到下方出现了该IP的位置信息,代表该IP正常可配置。
最后点击下方的【保存】,然后选择【打开】
* [**流量套餐**如何获取**“主机:端口”、“代理账号”、“代理密码”** 信息](/zh/traffic/using-setup)
* [**静态长效ISP**如何获取**“主机:端口”、“代理账号”、“代理密码”** 信息](/zh/static/used)
3、成功进入代理该代理的浏览器窗口,可以看到IP的检测信息是非常完美的数据,您可以使用该IP进行你的任何业务。
# 如何在Dolphin Anty中配置Cliproxy代理
1、登录Dolphin Anty(输入你的账号和密码登录),没有账号请完成账号注册流程
2、登录完成后
·点击右上角【CREATE PROFILE】
·选择【NEW PROXY】
·根据代理的类型选择,这里我们选择SOCKS5代理(Cli Proxy也支持HTTP/S等代理类型)
·粘贴您刚才复制的IP数据信息到代理配置栏内,点击右侧的检测,您会看到下方会展示你的该IP的信息
* [**流量套餐**如何获取**“主机:端口”、“代理账号”、“代理密码”** 信息](/zh/traffic/using-setup)
* [**静态长效ISP**如何获取**“主机:端口”、“代理账号”、“代理密码”** 信息](/zh/static/used)
·检测完成之后,点击右下角【CREATE PROFILE】
3、点击 【START】,打开你配置的代理的窗口,可以看到位置更换成功。
# 如何在NestBrowser中配置Cliproxy代理
1、登陆【Nestbrowser】,没有账号请完成私人账号的注册流程。
2、根据步骤点击【新建浏览器环境】,输入任何信息到配【环境名称】内,选择【代理类型】为Socks5,在下方代理配置栏输入您从Cliproxy后台复制的IP数据信息,然后点击【检查代理】—下方显示 连接测试成功,最后点击 【保存】。
* [**流量套餐**如何获取**“主机:端口”、“代理账号”、“代理密码”** 信息](/zh/traffic/using-setup)
* [**静态长效ISP**如何获取**“主机:端口”、“代理账号”、“代理密码”** 信息](/zh/static/used)
3、打开您刚才新建的浏览器环境,进入任何检测网址检测该IP真实信息,可以看到,当前的IP质量是原生家宽的纯净住宅IP,可以满足您的全部业务需求。
# 如何在MoreLogin中使用Cliproxy代理
MoreLogin是一款功能强大的指纹浏览器,专为多账户管理和隐私保护而设计。它允许用户创建多个独立的浏览器环境,每个环境都有独特的浏览器指纹,从而确保用户在不同平台上的账号安全。
1、登录【MoreLogin】,点击左上角【新建环境】,选择【新代理】并且‘ 代理类型 ’选择Socks5 , 在‘ 代理服务器 ’中粘贴您从Cliproxy后台复制的代理IP的数据信息(MoreLogin会自动识别并且准确收入信息),点击下方【代理检测】,可以看到检测成功,出现了该IP的具体信息 ; 最后点击【确定】。
* [**流量套餐**如何获取**“主机:端口”、“代理账号”、“代理密码”** 信息](/zh/traffic/using-setup)
* [**静态长效ISP**如何获取**“主机:端口”、“代理账号”、“代理密码”** 信息](/zh/static/used)
2、点击【确定】后会自动跳转主页,请点击 【启动】,以此来打开您刚才创建的代理浏览器的窗口环境。
3、进入浏览器窗口,可以看到该IP的质量是非常棒的【家庭宽带-极度纯净-原生IP】,并且该IP的速度测试也完美符合市场大多数业务的场景需求。
# 如何在Linken Sphere中使用Cliproxy代理
1、登录【Linken Sphere】,进入主页面,点击左上角 【New Session】,设置该代理窗口的选项,选择【Edit Session】。
2、在下方 【Connection】中选择代理类型为 Socks5,并把您从Cliproxy后台复制的IP信息数据,粘贴在后面一栏,然后点击 【Check Proxy】,可以看到下方显示了该IP的国家地区信息,证明该IP检测成功;最后点击下方 【Save&Run】,会自动关闭当前页面并进入该配置环境。
* [**流量套餐**如何获取**“主机:端口”、“代理账号”、“代理密码”** 信息](/zh/traffic/using-setup)
* [**静态长效ISP**如何获取**“主机:端口”、“代理账号”、“代理密码”** 信息](/zh/static/used)
3、进入到窗口页面,访问任何检测网址查询该IP的数据信息,可以看到该IP的质量非常高【家庭宽带-极度纯净-原生IP】,可以满足任何业务的代理需求
# 本地浏览器如何使用Cliproxy
[Google Chrome 浏览器](/zh/browser1/google)
[火狐浏览器](/zh/browser1/firefox)
[Edge浏览器](/zh/browser1/edge)
# Google Chrome浏览器
在 Google Chrome 浏览器中使用 SOCKS5 代理,可以通过以下步骤设置:
## 方法一:通过 Chrome 启动参数设置
1. **关闭 Chrome**,确保没有 Chrome 的实例正在运行。
2. 打开 **命令提示符** 或 **PowerShell**(管理员模式下)。
3. 进入到 Chrome 安装目录,通常位于 `C:\Program Files\Google\Chrome\Application\` 或 `C:\Program Files (x86)\Google\Chrome\Application\`。
4. 输入以下命令启动 Chrome,并通过 `--proxy-server` 参数指定 SOCKS5 代理:
```bash
start chrome.exe --proxy-server="socks5://<代理服务器>:<端口>"
```
例如:
```bash
start chrome.exe --proxy-server="socks5://127.0.0.1:1080"
```
这会启动 Chrome 并通过指定的 SOCKS5 代理进行连接。
5. 如果想使用HTTP代理则将上方命令中**socks5改为http**即可
## 方法二:通过系统代理设置
1. 打开 **Windows 设置**。
2. 选择 **网络和 Internet** > **代理**。
3. 在 **手动代理设置** 部分,启用 **使用代理服务器**,并输入 SOCKS5 代理的 IP 地址和端口。
4. 点击 **保存**,然后重启 Chrome。
这样 Chrome 会自动使用系统代理设置。
**特别说明:Chrome无法直接设置账密,所以上述步骤仅对**[**静态IP白名单模式**](/zh/static/used)**有效,如果想使用**[**Cliproxy流量计划**](/zh/traffic)**则需要额外下载扩展程序进行配置**
# 火狐浏览器
在 Firefox 浏览器中使用 SOCKS5 代理,可以按照以下步骤进行设置:
#### 步骤:
1. 打开 **Firefox 浏览器**。
2. 点击右上角的 **三条横线(菜单)**,选择 **设置**(Settings)。
3. 在左侧的菜单中选择 **网络设置**(Network Settings),然后点击 **设置...**(Settings)按钮。
4. 在弹出的 **连接设置** 窗口中,选择 **手动代理设置**(Manual proxy configuration)。
5. 在 **SOCKS 主机**(SOCKS Host)框中输入你的 SOCKS5 代理的 **IP 地址**,在 **端口**(Port)框中输入相应的端口号。
6. 确保选中 **SOCKS v5**,而不是默认的 **SOCKS v4**。
7. 如果你希望 Firefox 使用 SOCKS5 代理进行 DNS 请求(确保 DNS 通过代理进行解析),请勾选 **远程 DNS 解析**(Proxy DNS when using SOCKS v5)。
8. 完成设置后,点击 **确定**(OK)。
#### 示例:
* **SOCKS 主机**:`127.0.0.1`
* **端口**:`1080`
完成设置后,Firefox 会通过指定的 SOCKS5 代理进行网络访问。
这会将 Firefox 的网络流量通过 SOCKS5 代理进行传输,而无需更改系统级别的代理设置。
**特别说明:火狐浏览器无法直接设置账密,所以上述步骤仅对**[**静态IP白名单模式**](/zh/static/used)**有效,如果想使用**[**Cliproxy流量计划**](/zh/traffic)**则需要额外下载扩展程序进行配置**
# Edge浏览器
要在 Microsoft Edge 浏览器中使用 SOCKS5 代理,你需要通过系统代理设置或启动参数进行配置,因为 Edge 本身没有直接的代理设置选项。
以下是两种设置 SOCKS5 代理的方法:
#### 方法一:通过系统代理设置
1. 打开 **Windows 设置**,按下 **Windows + I**。
2. 进入 **网络和 Internet** > **代理**。
3. 在 **手动代理设置** 部分,开启 **使用代理服务器**。
4. 输入 **SOCKS5 代理服务器的 IP 地址** 和 **端口**。
5. 点击 **保存**,然后重新启动 Edge。
**示例:**
* **代理服务器**:`127.0.0.1`
* **端口**:`1080`
保存设置后,Edge 会通过指定的 SOCKS5 代理路由其网络流量,因为它会使用系统的代理设置。
#### 方法二:通过启动参数配置
你也可以通过命令行启动 Microsoft Edge,并指定 SOCKS5 代理。
1. 关闭 Edge 浏览器(如果已打开)。
2. 打开 **命令提示符** 或 **PowerShell**(以管理员身份)。
3. 进入 Edge 安装目录,通常位于:
* `C:\Program Files (x86)\Microsoft\Edge\Application\`
4. 使用以下命令启动 Edge,并通过 `--proxy-server` 参数指定 SOCKS5 代理:
```bash
start msedge.exe --proxy-server="socks5://<代理服务器>:<端口>"
```
例如:
```bash
start msedge.exe --proxy-server="socks5://127.0.0.1:1080"
```
这将启动 Microsoft Edge,并通过指定的 SOCKS5 代理进行连接。
**特别说明:Edge浏览器无法直接设置账密,所以上述步骤仅对**[**静态IP白名单模式**](/zh/static/used)**有效,如果想使用**[**Cliproxy流量计划**](/zh/traffic)**则需要额外下载扩展程序进行配置**
# 常见问题
# 如何验证代理是否有效(带账号密码验证)
验证 SOCKS5 代理是否正常工作,可以通过多种方法。以下是几种常见的验证 SOCKS5 代理的方法
#### 1. **使用命令行工具(带账号密码验证)**
* **Socks5代理:** 你可以使用 `curl` 来进行认证并测试Socks5代理:
```bash
curl --proxy socks5://username:password@Hostname:Port https://mayips.com
```
如果代理有效,且认证成功,你将会看到网页的响应。如果认证失败,通常会收到 `403 Forbidden` 或其他认证错误的响应。
* **HTTP代理:** 对于HTTP代理,使用类似的方法:
```bash
curl --proxy http://username:password@Hostname:Port https://mayips.com
```
如果代理有效且密码正确,响应会显示网页内容。如果有错误,通常会提示认证失败(例如 `407 Proxy Authentication Required`)。
#### 2. **使用浏览器配置(带账号密码验证)**
如果你希望手动验证带有账号密码的代理,可以在浏览器中设置代理:
* **Chrome/Firefox**:
1. 打开浏览器的代理设置(通常在网络设置中)。
2. 输入代理服务器地址、端口、用户名和密码。
3. 访问一个网站,查看是否能够成功加载页面。如果代理和认证正确,你会看到网站内容;如果失败,浏览器通常会提示 `代理认证失败` 或 `403 Forbidden`。
#### 3. **使用代理验证软件(带账号密码验证)**
许多代理验证工具也支持通过账号和密码验证代理,例如 **Proxy Switcher**、**Proxifier** 等。在软件中配置代理时,输入代理服务器的地址、端口、用户名和密码,然后测试代理是否工作正常。
#### 4. **通过Postman进行测试**
你也可以使用Postman来测试代理是否有效。配置代理并在Postman中设置认证信息(用户名和密码),然后发送请求,查看响应是否正常。
#### 代理认证失败时的常见错误
* `407 Proxy Authentication Required`: 代理服务器要求认证。
* `403 Forbidden`: 代理认证失败,或者代理服务器不允许访问。
* `Timeout`: 代理请求超时,可能是代理服务器不可达或配置错误。
这些方法适用于带有用户名和密码认证的代理,能够帮助你验证代理的有效性。
# Android如何使用Cliproxy
Android 系统提供了通过 Wi-Fi 设置进行代理配置的方式,可以为特定的网络配置代理。
1. **连接到 Wi-Fi 网络**:
* 打开设备的 **设置**。
* 进入 **Wi-Fi** 设置,选择你想要配置代理的 Wi-Fi 网络。
2. **配置代理**:
* 在 Wi-Fi 网络设置中,点击 **已连接的网络**(网络名称)。
* 点击 **修改网络** 或 **高级设置**(具体选项根据 Android 版本不同有所变化)。
* 启用 **代理** 设置,通常有三个选项:
* **无**:不使用代理(默认)。
* **手动**:手动配置代理服务器。
* **自动**:通过自动代理配置文件(PAC)进行设置。
3. **输入代理详情**:
* 选择 **手动**,输入代理服务器的 IP 地址和端口(例如,SOCKS5 或 HTTP 代理)。
4. **保存设置**:
* 完成后,点击保存,网络连接会通过指定的代理服务器进行流量转发。
**配置代理的注意事项:**
* 在 Android 中,只有通过 Wi-Fi 连接的网络才能配置代理。移动数据连接(如 4G 或 5G)通常无法直接在系统设置中配置代理。
* 一些 Android 应用(如浏览器或其他应用)可能会提供独立的代理设置。
# iOS如何使用Cliproxy
iOS 设备的代理配置也通过 Wi-Fi 网络设置进行,方法与 Android 类似。
1. **连接到 Wi-Fi 网络**:
* 打开设备的 **设置**。
* 进入 **Wi-Fi** 设置,选择你想要配置代理的 Wi-Fi 网络。
2. **配置代理**:
* 在连接的 Wi-Fi 网络旁边点击 **i**(信息按钮)。
* 向下滚动到 **HTTP 代理** 部分,选择 **手动** 或 **自动**。
* **手动**:手动输入代理的 IP 地址、端口及认证信息(如果需要)。
* **自动**:使用 **自动代理配置** (PAC) 文件来自动配置代理。
3. **输入代理详情**:
* 如果选择 **手动**,输入代理服务器的 **地址** 和 **端口**。
* 输入代理的用户名和密码(如果需要身份验证)。
4. **保存设置**:
* 设置完成后,返回,iOS 设备的所有流量(通过该 Wi-Fi 网络)将通过配置的代理进行路由。
**配置代理的注意事项:**
* 与 Android 相似,iOS 也仅允许你为 Wi-Fi 连接配置代理,不能直接为移动数据配置代理。
# 多设备登录如何扣费
多设备登录按照实际使用扣费
# 什么是住宅IP
**住宅IP(Residential IP)是由互联网服务提供商(ISP)分配给家庭用户的IP地址。与数据中心IP**(通常由服务器托管、云服务提供商等分配)不同,住宅IP通常由普通家庭宽带用户通过ISP提供的互联网连接获得,并与特定的物理地址(如家庭住址)相关联。
**特点:**
* **分配来源**:住宅IP是通过ISP分配给普通家庭用户的,通常与家庭用户的宽带连接相绑定。
* **地域性**:住宅IP通常关联到特定的地理位置。ISP根据用户的物理位置(家庭住址)分配IP地址。
* **可信度**:住宅IP通常被认为来自“正常的”用户,而非企业或数据中心,因此它们的活动通常被认为是可信的。
#### 1. **住宅IP的优势**
* **高可信度**:由于住宅IP是通过普通家庭宽带分配的,它们通常不会被认为是爬虫、机器人或恶意活动来源,因此很多网站和在线服务会更容易信任这些IP,减少被封禁的风险。
* **避免封禁**:许多网站(尤其是社交媒体、金融网站等)会对**数据中心IP**进行严格监控,认为它们可能来自爬虫或自动化程序。而住宅IP由于看起来像真实的用户行为,因此更容易绕过这些防护措施。
* **地理定位精确**:住宅IP通常与特定地区的ISP绑定,因此能够提供准确的地理定位信息。这对于一些地域限制的服务或网站非常有用。
#### 2. **住宅IP与数据中心IP的区别**
* **住宅IP**:
* 来源于家庭宽带连接,由ISP分配给个人或家庭用户。
* 具有较高的可信度,通常被认为是来自普通用户。
* 经常用于绕过IP封锁、执行市场调研、广告验证等任务。
* IP地址通常与用户的实际地理位置绑定。
* **数据中心IP**:
* 来源于数据中心、云服务提供商等地方,通常由企业或托管服务使用。
* 由于它们通常与自动化或商业活动(如爬虫、批量访问等)相关,很多网站对这些IP进行更严格的审查。
* 它们不具有住宅IP的可信度,且经常被某些服务视为潜在的恶意流量来源。
#### 3. **住宅IP的用途**
住宅IP通常用于以下几种场景:
* **网络爬虫和数据采集**:用于抓取网页数据(如SEO、市场研究等),避免因使用数据中心IP而被封禁。
* **广告验证**:通过住宅IP验证广告的真实性,确保广告在用户的实际环境中正常展示。
* **IP隐匿/绕过封锁**:通过住宅IP绕过地域封锁,访问某些只允许特定地区访问的网站或服务。
* **账户注册和管理**:在需要大量注册或管理账户的场景中,住宅IP可以帮助避免被平台识别为自动化行为。
* **金融交易和分析**:一些金融交易平台可能会要求IP地址来自特定地理区域,住宅IP能够提供这种准确的地域信息。
#### 4. **住宅IP的缺点**
尽管住宅IP有很多优点,但也有一些缺点:
* **成本较高**:获取住宅IP比使用数据中心IP的成本要高,因为它们涉及到ISP的基础设施和家庭宽带网络。
* **供应量有限**:住宅IP资源通常较为有限,尤其是高质量的住宅IP池,这使得一些使用这些IP的场景变得更加昂贵。
* **可能会被滥用**:由于住宅IP的高可信度,它们有时会被一些恶意活动(如虚假注册、广告作弊等)所滥用,导致一些IP池被封锁或标记为不可信。
#### 5. **静态住宅IP vs 动态住宅IP**
* **静态住宅IP**:指分配给用户的IP地址在较长时间内保持不变。这类IP通常用于需要持续、稳定连接的服务,如服务器、远程办公、远程访问等。
* **动态住宅IP**:指每次用户连接到互联网时,可能会获得不同的IP地址。大多数家庭用户通常使用动态住宅IP。
#### 6. **如何获取住宅IP**
* **ISP提供**:一般情况下,住宅IP是通过家庭互联网宽带连接(如ADSL、光纤、无线网络等)由ISP分配给用户的。通过正常的家庭宽带套餐,用户会获得一个动态或静态的住宅IP。
* **代理服务提供商**:一些代理服务商提供住宅IP代理,用户可以购买这些代理IP来执行爬虫、广告验证等任务。这些代理IP通常会通过多种方式(例如在多个家庭宽带网络中共享)来分配。
#### 7. **住宅IP在隐私保护中的作用**
由于住宅IP来源于普通家庭宽带,它通常不像数据中心IP那样容易被追踪。使用住宅IP时,用户可以隐藏真实IP,减少被定位或追踪的风险,因此在隐私保护方面,住宅IP也有其独特的优势。
#### 总结
**住宅IP**是通过家庭宽带互联网接入提供的IP地址,它因来源于普通用户的家庭宽带连接而具有较高的可信度,广泛应用于爬虫、广告验证、地理定位等领域。与**数据中心IP**相比,住宅IP更难被识别为机器人或恶意流量,通常可以绕过很多网站的封禁机制,但它的获取成本较高,且供应量有限。
# 什么是静态IP
**静态IP**(Static IP)是指一个 **固定不变** 的互联网协议地址。它是由 **互联网服务提供商(ISP)** 或网络管理员分配给设备(如计算机、服务器、路由器等)的IP地址,这个地址在 **很长一段时间内不会改变**,除非用户手动更改。
#### 特点:
1. **固定不变**:一旦分配,静态IP地址通常不会改变,设备每次连接网络时都会使用相同的IP地址。
2. **长期有效**:静态IP通常不会像动态IP那样随连接断开而变化,它会保持固定,适合需要稳定和长期连接的应用场景。
3. **手动配置**:静态IP通常需要手动配置,或者通过ISP提供的特殊服务进行分配。
4. **唯一性**:静态IP在网络上是唯一的,通常绑定到设备或用户的特定位置。
#### 静态IP的优势:
1. **稳定性**:静态IP地址的稳定性非常高,适合那些需要稳定连接的应用。
2. **便于远程访问**:对于服务器、路由器等设备,静态IP确保用户或管理员能够通过相同的IP进行远程管理和访问。
3. **提供可靠的地理定位**:静态IP通常与特定的地理位置和设备绑定,因此更适用于需要基于地理位置的服务。
#### 静态IP的劣势:
1. **安全风险**:因为静态IP地址不变,黑客可以针对特定的IP进行攻击。对安全性要求高的服务(如数据库、在线支付等)可能需要加强防护措施。
2. **成本较高**:由于需要专门配置和维护,静态IP通常需要额外收费,成本高于动态IP。
3. **IP地址有限**:静态IP属于有限的资源,尤其是在大型网络中,可能需要合理分配和管理,避免浪费。
# Cliproxy支持哪些IP代理协议
Cliproxy是一个提供 **IP代理** 服务的公司,广泛用于 **网络爬虫**、**数据抓取**、**广告验证**、**SEO优化**、**账户管理**等多种场景。它支持多种类型的代理协议,包括:
#### 1. **HTTP/HTTPS 代理**
* **HTTP Proxy**:通过 **HTTP** 协议转发网络请求,支持**普通网页浏览**、**API请求**等。
* **HTTPS Proxy**:与HTTP代理类似,但支持 **加密通信**,用于访问需要HTTPS协议的安全网站,确保数据传输的安全性。
* **应用场景**:
* 网站抓取、API接口访问、广告验证等需要处理网页请求的场景。
* HTTPS代理用于更高安全性的场景,如处理敏感数据、支付验证等。
#### 2. **SOCKS5 代理**
* **SOCKS5 Proxy**:一种更通用的代理协议,支持各种网络流量类型,支持更复杂的 **网络应用**。相比HTTP代理,SOCKS5代理具有更高的灵活性和稳定性。
* **应用场景**:
* 适用于 **P2P下载**、**网络游戏**、**视频流媒体观看**、**远程桌面连接**等。
* 由于其支持各种协议,它常被用于绕过防火墙、隐匿IP地址,或者在爬虫程序中使用,避免被目标网站检测到。
# 为什么出口IP和选择的不一样
每个IP检测网站都是基于数据库进行查询的,而数据库又有新旧差异,所以导致查询出来的IP地址、ISP类型、归属地等信息有所不同。如果影响到业务开展,你可以联系客服进行IP更换
推荐几个IP检测网站:
[https://whoer.net](https://whoer.net/)
[https://ipinfo.io](https://ipinfo.io/)
[https://mayips.com](https://mayips.com/)
# Cliproxy流量套餐如何快速集成使用
在Cliproxy中,代理的连接参数(主机、端口、账号、密码)具有特定的逻辑,以实现通过中间服务器动态选择出口 IP。
#### 主机与端口
**主机(Host):** 连接的 Socks5 中间服务器 IP 或域名。
**端口(Port):** 中间服务器监听的 Socks5 端口。
**作用:**
* 所有客户端均连接到相同的中间服务器。
* 该服务器充当代理请求的转发中心。
**特别说明**:目前仅提供**us.cliproxy.io**(美国)和**sg.cliproxy.io**(新加坡)作为中间服务器,请选择距离出口IP所在地区较近的中间服务器
#### 账号
**格式1(Sticky IP):**`username-region-地区缩写-st-州省名-sid-当前会话唯一标识-t-IP持续时间(`例如:test123456-region-US-st-Louisiana-sid-e6CXdJDm-t-15)
**格式2(Rotating IP)**:`username-region-地区缩写-st-州省名(`例如:test123456-region-US-st-Louisiana)
**作用:**
* 账号部分 (`username`) 用于识别用户身份。
* 服务器解析 `username` 后`region` `st`的参数,并根据配置选择合适的出口。
**特别说明**:
* 所有参数以“-”分割,其中**username**以及**region**为**必填**项,其他参数可为空。例如格式1可以为**test123456-region-US-t-15** 格式2可以为**test123456-region-US**
* **当前会话标识(sid)**更改则会判定为新请求,中间服务器会自动分配一条**新IP**
* **国家代码参考**[ISO 3166-1](https://cliproxy.com/zh/iso-code/)国际标准
#### 密码
**作用:**用于用户身份认证。不影响出口 IP 选择,仅用于安全校验。
#### 逻辑流程
**客户端连接 Socks5 服务器**
* 使用指定的主机:端口进行连接。
**服务器解析账号信息**
* 提取 `username` `地区参数` `会话类型`信息
* 验证 `username` 是否有效。
* 根据`地区参数`查找 `出口IP` 是否可用(若未指定,则使用默认策略分配)。
**密码认证**
* 服务器校验 `password` 是否正确。
* 若认证失败,则拒绝连接。
**出口 IP 选择**
* 若账号中明确指定了 `出口IP地理位置`,则使用该 地理位置IP 作为出口。
* 若未指定 `地理位置`,则根据预定义策略(如轮询、负载均衡等)分配出口 IP。
**连接目标服务器**
* 服务器根据解析的出口 IP,向目标地址发起连接,并转发流量。
#### 典型示例
| Cliproxy账号 | 连接出口IP所在地 | 备注 |
| --------------------------------------------------- | ------------ | --------------------------------------- |
| test123456-region-US-st-Louisiana-sid-e6CXdJDm-t-15 | 美国Louisiana州 | 当sid切换,出口IP也会切换。当sid不变,则出口IP持续15分钟后自动切换 |
| test123456-region-SG-t-15 | 新加坡 | 空 |
| test123456-region-HK | 香港 | 每次请求都会以一个新的出口IP连接目标网站 |
# 不限量代理教程-带宽套餐
# 账密模式
一、进行注册登录,进入套餐页面购买不限量住宅代理-带宽,购买完毕进入控制台菜单点击“不限量”即可看到已购买的套餐。目前Cliproxy支持有效期3小时,1天,7天,30天,可根据自己的需求进行选择带宽和有效期。若您有更高的需求,可以选择进行定制套餐,有问题可以及时联系我们的客服。购买以后页面跳出购买凭证。点击该页面购买凭证直接跳转到指定购买套餐页面。
二、选择需要的主机名:端口、国家地区、会话类型,其中会话类型有Sticky IP(粘性IP)和Rotating IP(轮转IP)两种类型
Sticky IP(粘性IP):在规定时间内目的IP不会更改,当超过设定时间后IP自动更改为同条件下其他IP,同一IP地址可支持长达120分钟会话。
Rotating IP(轮转IP):每次请求都会用一个新的IP访问目的地址
三、在下方自行选择HTTP(S)/SOCKS5,在“**命令提示符(cmd)**”中测试是否可以正常使用
四、使用时复制代理所需的主机名:端口、用户名、密码具体信息配置在指纹浏览器或支持HTTP、Socks5代理的程序里即可
# 不限量代理教程-端口套餐
# 账密模式
一、进行注册登录,进入套餐页面购买不限量住宅代理-端口,购买完毕进入控制台菜单点击“不限量”即可看到已购买的套餐。目前Cliproxy支持有效期3天,7天,30天,可根据自己的需求进行选择端口和有效期。若您有更高的需求,可以选择进行定制套餐,有问题可以及时联系我们的客服。购买以后页面跳出购买凭证。点击该页面购买凭证直接跳转到指定购买套餐页面。
二、点击编辑,设置需要的用户名、密码、国家/地区、轮转周期、格式,点击确认修改
三、使用时复制主机名:端口、用户名、密码或复制代理命令,粘贴到指纹浏览器或支持HTTP(S)、Socks5代理的程序里即可
# 白名单模式
一、进行注册登录,进入套餐页面购买不限量住宅代理-端口,购买完毕进入控制台菜单点击“不限量”即可看到已购买的套餐。目前Cliproxy支持有效期3天,7天,30天,可根据自己的需求进行选择端口和有效期。若您有更高的需求,可以选择进行定制套餐,有问题可以及时联系我们的客服。购买以后页面跳出购买凭证。点击该页面购买凭证直接跳转到指定购买套餐页面。
二、点击编辑,输入需要授权的IP地址(支持批量添加,多个IP通过逗号分割),点击保存。
三、添加的白名单IP无需进行用户名和密码的校验,只需要配置主机名和端口即可使用代理。